Wednesday, June 22, 2022

I love you to The Moon & Back

 Good morning!
I normally create mixed media/grungy layouts, not very often I create cute or fun layouts BUT I had these really fun papers from Craft O'clock that were too adorable to not work with!


I used the Craft O'Clock Cosmic Adventures in layers


I fussy cut these images from some of the fun paper


I received this super cute charm and it was the perfect title for my layout! 


Here you can see the dimension of layout!


Thanks so much fro stopping by!

Tuesday, June 21, 2022

"A Friend..." Memorydex Scripture Card

 Happy Tuesday, friends!

It's Nancy here with a new project share!

 This week I am sharing another Memorydex Scripture Card.
If you missed my first Scripture Cards, you will find them HERE!

 I always enjoy using Scripture verses in my projects.
They can offer instruction, comfort, or food for thought.
For the base of my card, I again used one of the Heidi Swapp Memorydex File Cards.

Here's the front of my card:


As always, the front of my card contains the Bible reference of my verse.
I also added a cute stamp, that coordinates with the main stamp I used on the other side. 
I also used some fun papers, and added some white Nuvo Drops.

Here's the back of my card: 


Here I used the main stamp and some more great papers.
I also added some more fun Nuvo Drops.
I always like to hand-write my Scripture verse and reference.
I find that it really helps me remember them.

A true friend really does love at all times!
Please be a friend to someone today! :o)

* * * * *

White Rose Crafts Products Used:


* * * * *

Thanks so much for stopping by!
Please come back next week to see another fun project for
White Rose Crafts LLC.

* * * * *

Wednesday, June 15, 2022

Just For You Card

    Hello, my friends!

It's Nancy back with my weekly project for White Rose Crafts LLC.  

 This time I made a very simple card.
It's an easy one to mail out to a friend
because it doesn't have any bulky embellishments!

Here's my card:


Isn't she sweet?
She's from a fun Woodware Stamp Set called Mary and Friends.


I started with a gold coloured cardstock card base.
To the front of the card I added this cheerful paper from the BoBunny Believe Collection.


I stamped the image with Memento Tuxedo Black Ink.
I did some simple colouring with my Spectrum Noir Markers.
I had stamped a variety of images onto my white cardstock,
and roughly cut them apart, as I intended to fussy cut them out.
When I saw the shape of this image I decided to leave it as is.
I thought the angle added some interest, so I just matted it,
and adhered it in place with foam tape.


The sentiment is included in the stamp set. 
I matted it and used more foam tape to adhere it in place.
Just a simple card that was lots of fun to make!

* * * * *

White Rose Crafts Products Used:


* * * * *

Thanks so much for stopping by!
Please come back next week to see another fun project!

* * * * *

Tuesday, June 14, 2022

Time you Enjoy

 Good morning!
I have been happily married for over 22 years and I love spending time just hanging out with him in the shop listening to music and having a drink.


I covered Craft O'clock Age Of Technology with clear gesso


I used dark brown brusho powder mixed with an AALL & Create Stencil


I used some turquoise powder to highlight the stenciled image


 On the cover of the page I  cut the images of papers to use as photo mats and fussy cut the tags.  For the


For the Creative Embellishments chipboard, I used coarse texture paste then inked with Ground Espresso then misted and sprayed with various sprays and paints


Thanks for stopping by

Laura

Tuesday, June 7, 2022

"Hello" Card

   Hello, my friends!

It's Nancy here with a new card share!

My card today was totally inspired by this pretty paper!
It's another page from the ScrapBerry Garden of Delights 6 x 6 Paper Pad.

I've been stitching longer than I've been paper-crafting,
so when I saw this paper with an even weave fabric design
...well...I just had to stitch on it!

Here's my card:


Isn't that a lovely paper for stitching?
I simply wrote "hello" on the paper with pencil.
 I then took my piercing tool and pierced holes evenly along the pencil lines.
I erased the pencil lines and did a simple running stitch along the holes.


Here's a closer look at the paper and the stitching.


I added the ScrapBerry Bird in Basket Charm
to a piece of the pink Dovecraft Forget-Me-Not Raffia String.
I tied it in a bow and adhered it in place.


I took three pretty Mulberry Paper Flowers,
twisted up the green stems, and adhered them in place!


I love stitching and stitching on paper is really fun! 
Give it a try!

* * * * *

White Rose Crafts Products Used:


* * * * *

Thanks so much for stopping by!
Please come back next week to see another fun project for
White Rose Crafts LLC.

* * * * *
 Nancy :o)
The Nickel Nook

Saturday, June 4, 2022

The Graduate

 Good morning!
We are so proud of our son who graduated last year from college on the deans list and as a Canadian Scholar.  Covid really put a damper on everything...no ceremony with his cap and gown so we improvised!


I prepped the Craft O'Clock Vintage Bisou paper with clear gesso


I then used one of my new favorite stencils, the AALL & Create splatter Stencil, with coarse texture paste and brown brusho powder mixed in.  I added a little green colorant to add some interest.


I misted some flowers from my stash and inked some chipboard


I added the graduate charm I received in one of my orders!


Thanks for stopping by

Laura

Wednesday, June 1, 2022

What a Sweet Day Easel Card

  Hello, friends!

It's Nancy here with you today, and it's time for a new project for White Rose Crafts LLC.  

Today I have another card featuring products from Scrapberry,
along with a few other products.

Here's my card:


This is one of the beautiful papers from the Garden of Delights Paper Pad!
Doesn't it make you want to walk right into that gorgeous scene?
It was calling out to me to be made into an easel card.
You walk up from a field of green to follow along the pretty path!


I wrapped a piece of the green raffia, 
from the Dovecraft Forget-Me-Not Raffia String, around the green patterned base.
   I punched out some labels and layered them on some foam tape,
which I positioned on top of the raffia.
This, along with some pretty pearls, serves as a stopper. 


 When it came to adding the sentiment,
I wanted to ensure it was something that suited the scene.
This little word label caught my eye, and seemed just right!
It's a part of the Melissa Frances The Sweet Life Mini Album Kit.
This kit happens to be on my desk, as I'm working on it for an upcoming post.


Here's a closer look at the sweet ScrapBerry Bird in Round Charm.
I tied a raffia string bow through the loop of the charm,
and adhered in in place in the scene.


Sometimes when making a project, using paper such as this,
it's fun to escape into a bit of a fantasy land that the scene offers! ;o)

* * * * *

White Rose Crafts Products Used:


* * * * *

Thanks so much for stopping by!
Please come back next week to see another fun project for
White Rose Crafts LLC.


Tuesday, May 24, 2022

Best Wishes Card

  Hello, everyone!

It's Tuesday, so it's Nancy here with a new project share.  

Today I have another card featuring products from Scrapberry,
along with a few other products.

Here's my card:


The papers in the Garden of Delights Paper Pad are just so pretty!
They make it easy to put together a lovely card.
I layered this pretty blue paper onto a navy card base.


I just love the pretty birds in the top corner. 
I added the "BEST WISHES" from the 13@rts Alice in Candyland Sticker Sheet.
These clear stickers blend beautifully into any coloured background.


I wrapped some of the pink raffia,
around the bottom of the card.
I also added the pretty ScrapBerry Lovebirds Charm.


There are so many fun products in the shop
that make it quick and easy to create a pretty card!

* * * * *

White Rose Crafts Products Used:


* * * * *

Thanks so much for stopping by!
Please come back next week to see another fun project for
White Rose Crafts LLC.

* * * * *

Tuesday, May 17, 2022

Over the Rainbow Card

  Hello, friends!

It's Nancy here with you today!

 I have a card featuring products from Scrapberry. 


The background paper is from the beautiful Garden of Delights Collection.


It's the perfect backdrop for this lovely stamp. 

I stamped the image with Archival Ink,
and then coloured it in with some watercolour crayons and a water brush.
It has some beautiful sparkle and shimmer to it.


I adhered the image in place using foam tape.

To finish things off, I added a pretty Raffia String bow.
I wanted a fuller bow, so I opened the string up before tying it
and adhering it in place.


Another fun project,
put together with great products from White Rose Crafts LLC! 

* * * * *

White Rose Crafts Products Used:


* * * * *

Thanks so much for stopping by!
Please come back next week to see another fun project for
White Rose Crafts LLC.

* * * * *
 Nancy

Friday, May 13, 2022

Calm

 Good morning!

I love working with 13 @rts!  They are such high quality and beautifully designed!

After I prepped the beautiful Dreamland paper with clear gesso, 


 I then applied molding paste with the AALL & Create Lotza Starz stencil


 I fussy cut the flowers and title from this paper


 I added some flowers and some from my stash, some beads, arts stones and colored cheese cloth

I hope I inspired you to create!

Thanks for stopping by

Laura

Tuesday, May 10, 2022

Garden Tea Party Mini Album Final

   Hello, friends!

It's Nancy back with you today!
I am sharing my final post using the Garden Tea Party Cardmaking & Craft Kit.

This kit has been sold out. 
However, I have to show you the final pages of my album.
If you were lucky enough to get the kit
then you might find some inspiration of what to do with it.

Here are the next pages:


Lots of room on the left page to add a photo or do some journaling.
On the right, there is a flip-up with a belly band to hold a tag.
The butterfly was fussy cut, and the pretty little bow is included in the kit.


Under the flip-up there is lots of room to add another photo.


The left page has another stamped rose tuck spot and some pearls.
The right page has another half doily tuck spot, and two fussy cut butterflies.
Tucked inside the doily is a second mulberry paper envelope,
with a pearl cardstock insert.


Here the left side has a pretty pocket strip that houses a stamped tag.
It also has some pretty pearls and a stamped cupcake tuck spot.
The right side is the inside back cover.
It matches the front, with a large pocket with tag, a fussy cut butterfly,
and more of the gorgeous lace.


Here is a look at all the tags and inserts that I have tucked in my album.
Everything has been stamped in coordinating colours,
using the stamp set included in the kit.

This was a really fun kit to work with!
I'd love to see what you make with your kit!

* * * * *

White Rose Crafts Products Used:


* * * * *

Thanks so much for stopping by!
Please come back next week to see another fun project for
White Rose Crafts LLC.

* * * * *

Tuesday, May 3, 2022

Mini Album Part 2 - Using the Garden Tea Party Cardmaking and Craft Kit

  Hello, friends!

Happy Tuesday! It's Nancy back with you today!

I'm here to share Part 2 of my Mini Album
created with the Garden Tea Party Cardmaking & Craft Kit.

Last week I shared the details of the cover.
This week we will take a closer look at the inside pages.

Here we go:


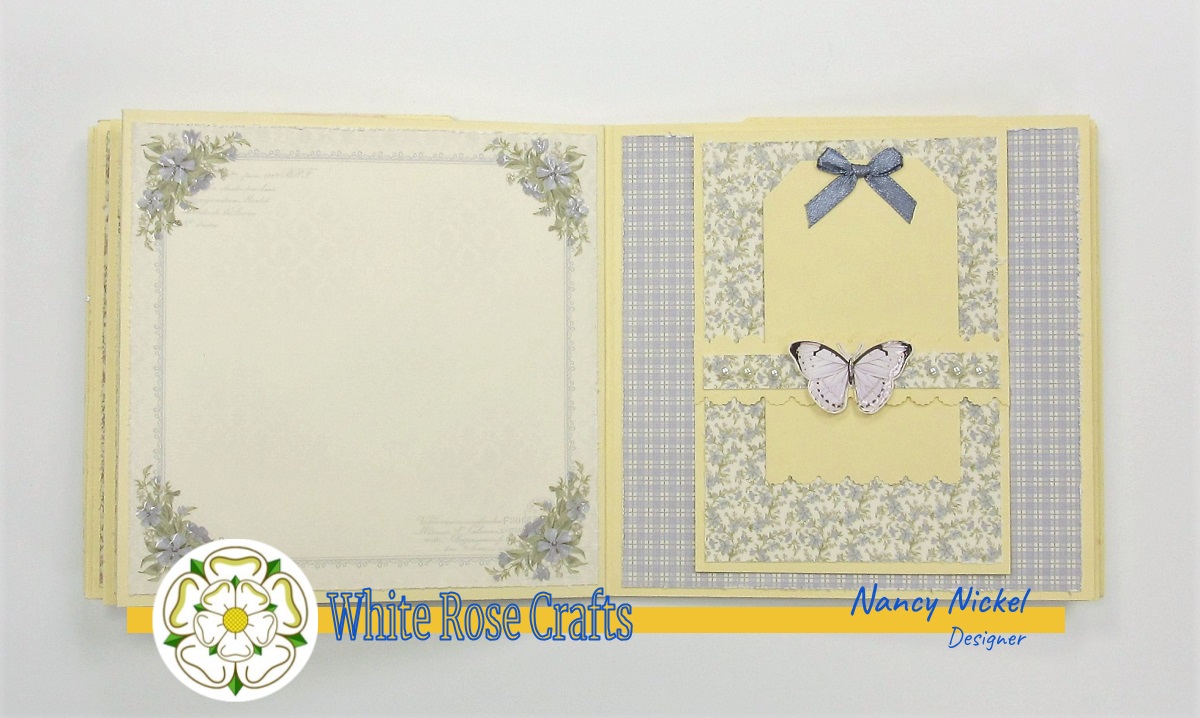
The inside front cover is lined with decorative paper.
I added a pocket, and then trimmed it with the lace from the kit.
The lace is absolutely gorgeous!
Into the pocket I have tucked a large tag with a butterfly topper.
The right side is where I added one of the half-doily tucks.
Into that is tucked the mulberry paper envelope.
I've added a butterfly to the envelope, and a pretty crystal sticker to the doily.
I also added pearls along the bottom of the page.


Here the left side has a little flip pocket.
The pocket is rimmed with more gorgeous lace.
In the pocket is a tag, lined with mulberry paper and a butterfly.


The pocket flips up for journaling on the back, and room for a full photo beneath.
The right side has a stamped rose tuck spot.


Here on the left, a stamped cupcake and teacup form a tuck spot.
On the right is a pretty pocket that holds two more tags.
The pretty little ribbon bows are the perfect tag topper.
I also added another fussy cut butterfly and more pearls


Here on the left is another stamped rose tuck spot.
On the right is another pocket that holds two more tags.
This time I topped the tags with pearls.
I also added another pretty resin cupcake.

That's it for today!
Next week I will share the last of the pages,
along with a closer look at all the tags and tucks 

* * * * *

White Rose Crafts Products Used:


* * * * *

Thanks so much for stopping by!
Please come back next week to see the final pages of my Mini Album

* * * * *

Nancy :o)