Tuesday, June 25, 2019

"Toadally" Awesome by Guest Designer Adam


Hello Crafting Peeps,
Today’s card is for the White Rose Crafts June theme of summer/summertime. I am using the Lawn Fawn – Toadally Awesome stamp set.  The following list of supplies can be found on the White Rose Crafts website.
Supplies:
Lawn Fawn – Toadally Awesome stamp set
                       Polka in the Meadow paper
                       Gotta Have Gingham paper
White and yellow cardstock
Copic Markers – greens and browns
Silver thread/seed beads


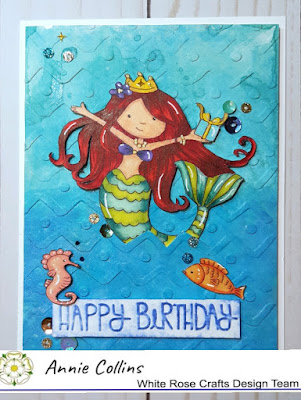
I like to start by stamping all my images in black on white cardstock and cutting them out which I did but decided to add a new twist to my coloring or lack of.  I stamped the frogs on Lawn Fawn –  Polka in the Meadow paper green and yellow to use as my coloring. I glued the green to the white cardstock and then the yellow bellies to the green. (paper piecing)  I then colored the logs and cattails with Copic markers.

Now I am ready to create the card base and layer one. First I made a yellow card base.
Then I cut a layer one (4” x 5 ¼”) in white cardstock and a light blue gingham layer one from Lawn Fawn – Gotta Have Gingham paper to be the background of the opening. I die cut a square into the white cardstock layer. I cut a white frame the same size as the opening to frame the opening.

The next step is to create the simulated waterfall effect. I used two frame cuts the same as the opening and lined the top and bottom with double sided tape. I cut up silver sewing thread and strung it across the opening using the tape to hold the string in place. Now for the time consuming part: I did not have a sewing needle that would clear the opening in the seed beads so I had to painstakingly thread all the tiny (and I mean tiny) seed beads onto all the thread pieces. I added beads randomly in water colors and various amounts to give the appearance of water falling down the card when moving the card back and forth. I placed the second frame on top of the thread and this sealed the thread and beads.

Yeah, have all the hard stuff done! Now I can assemble the card. Put the gingham layer onto the card base. Placed the waterfall in the frame layer next, added the white layer on top and proceeded to assemble the frog scene. I arranged the pieces until I was happy with the look and taped the pieces together on the back. I then added the frog scene into the framed waterfall opening and the card was almost complete. I stamped the sentiment onto some to the yellow polka dot paper and added it to the card front using foam tape. My final step was to add a few sequins and now I am finished!
I must admit I am happy with the completed look but will say the waterfall effect was very time consuming.  I hope you will give the waterfall technique a try.
Please check out White Rose Crafts when shopping for your crafting needs.

Monday, June 24, 2019

July "Mediterranean Dreams" Subscription Kit Unboxing

July Sub Kit

Want to get a first look at White Rose Crafts brand new July "Mediterranean Dreams" Subscription Kit...well you are in luck because today design team member EK has an unboxing video just for you!!!!


To watch the video in HD, click here.


The new kit will be shipping on July 1st, but you can start pre-ordering this kit now.  Our last kit sold out before everyone who wanted one got one, so do not miss out on this fun summer themed kit.  It will be gone before you know it.
 

Thursday, June 20, 2019

Five Fast Cards Featuring the Marvelous Men Cardmaking Kit, Part III


Hey friends!  It's EK and I am coming in today with the third and final Five Fast Cards video featuring the Limited Edition stand alone "Marvelous Men Cardmaking Kit" from White Rose Crafts

If you missed the unboxing of this kit, make sure to pop over and check out all the cool masculine crafting supplies.

If you missed the first Five Fast Cards I created for this kit, click here to see the video.

And here is the link the the second Five Fast Cards video in the series.

And if you want to watch today's video in HD, click here and you will magically be transported over to the youtube.


For a closer look at each of today's card, scroll down.


Card One
EK Gorman, White Rose Crafts, Marvelous Men 5FC3 a
Card one features one of the boat decoupage sets, some of the plaid paper, two different pieces of Petallic cardstock, die cutting from the included die, one of the cardstock stickers, and several metallic accents.

EK Gorman, White Rose Crafts, Marvelous Men 5FC3 b


Card Two
EK Gorman, White Rose Crafts, Marvelous Men 5FC3 c
The second card today features some stamping from the included stamp, two different Petallics cardstock pieces, some printed paper and metallic accents.

EK Gorman, White Rose Crafts, Marvelous Men 5FC3 d


Card Three
EK Gorman, White Rose Crafts, Marvelous Men 5FC3 f
Card three uses two of the printed papers, some trimmed Petallics cardstock, and a bunch of the the cardstock stickers from the kit.

EK Gorman, White Rose Crafts, Marvelous Men 5FC3 g


Card Four
EK Gorman, White Rose Crafts, Marvelous Men 5FC3 h
Card four features stickers from both of the sticker sheets included in the kit, some Petallic cardstock, stamping from the included stamp set and some metallic accents.

EK Gorman, White Rose Crafts, Marvelous Men 5FC3 i


Card Five
EK Gorman, White Rose Crafts, Marvelous Men 5FC3 j
My final card today features lots of background stamping, including the included Scrapberry Ink, some washi tape, some plaid paper, and some cardstock stickers.

EK Gorman, White Rose Crafts, Marvelous Men 5FC3 k


Thanks for peeking in today.  There are only a handful of kits and when they are gone, they are gone...so make sure you pick up yours today!  Until then, happy crafting.

Wednesday, June 19, 2019

Happy Birthday Mermaid Card

Hello Crafty Friends - Annie here with a fun card using embossing folders and an adorable mermaid stamp from Wild Rose Stamps.

If you haven't seen Design Team Member Alison's FB Live Embossapoolza Part 1 - You really need to check it out. 

Now, In keeping with her tutorials - I created this card.


As always - I start by stamping and coloring my images. I fussy cut them and colored the edges with the Memento marker. Then set them side. Next, I trim all my card pieces and grab two embossing folders.

I started by dying an A2 Card front panel of white cardstock using Distress Oxide in Broken China. I did the direct to the paper method and then sprayed some water that has a bit of perfect pearls mixed in. I heat set it.


Once the cardstock panel was dry I used the embossing folder. I then added some Distress Oxide in Mermaid Lagoon and some Distress Oxide in Blueprint Sketch watering them down with the perfect pearls mix for some shimmer.


Next, I embossed the sentiment and did the direct to paper technique with Distress Oxide Blueprint Sketchand did again a spray with the perfect pearls water mix.
 

Now, for assembling the card. I gathered all the card components and start by using the precision knife to cut into one of the waves so that I could tuck the mermaid. Then, I added some foam adhesive to the mermaid and placed her onto the card front panel. Next, I added foam adhesive to all of the card front panel and adhered it to the card base. I then adhered the sentiment and seahorse with some foam adhesive and I adhered the fish directly to the card front panel. 


Finally, I added a few sequins from Doodles Paper Playground and the card is complete!

Materials Used:
Memento Pen - Tuxedo Black
*(Please note that I used two folders from my stash.
 However, White Rose Crafts LLC carries a variety of embossing folders)
Sakura Gelly Roll Pens -Metallic Gold, Black & White
Recollections Brand Heavy Weight White Cardstock
Copic Markers: R59, BV17, BG72, BG09, G21, B00, & B01
Spectrum Noir Markers: CR10, DR1, HB1, CT4, GY4, 
BT3, CG1, CG2 MG1, CRI, & BO1,

Thank you for stopping by the blog today - I hope you found some inspiration!

Be sure to tag us White Rose Crafts LLC on social media 
if you create a project with products or kits purchased on the 

Tuesday, June 18, 2019

You make me Happy- a card by Guest Designer Adam


Hi All,
Adam here with another super fun card made with a Your Next Stamp – Humming By stamp set.  All my supplies are readily available at White Rose Crafts.  They are promoting summer themed cards for the month of June. I chose to create with a hummingbird and sunflower because I know summer is upon us when I see my first hummingbird.
I like to start by letting you all know what supplies are needed to create the card I am working on today.  They are:
     Masking tape/sheets/post-it notes
     Tim Holtz Oxide ink – background colors of choice (Squeezed LemonadeSpiced      
     Marmalade, Ripe Persimmon)
     Black ink for image stamping such as Memento Dye Ink in Tuxedo Black
     Copic Markers/coloring medium of your choice in colors of your choice
     White, green and black cardstock
     Glue and Double sided tape
     Sequins – Doodles Paper Playground Limited   

First, I stamp images to be colored on white card stock. I cut out the images and color them using Copic Markers.

The next step is masking the layer one (4” x 5 ¼”) white card stock in preparation for ink blending.  I like to use the upper 2/3rds of my design space on the card because this follows the rule of thirds. With this in mind I taped off two thin stripes and a larger strip.
Using three colors of Tim Holtz oxide that felt like summertime to me, I blended light to dark onto the card.  (Squeezed Lemonade, Spiced MarmaladeRipe Persimmon)
Now it is time for the assembling of the card.  I used double sided tape to adhere the sunflower and foam tape to pop the hummingbird to the blended area.  Using black ink I stamped the sentiment from the stamp set under the blended area. Added a few Doodles Paper Playground Limited   sequins and thought I was finished only to decide it needed a grounding effect for the sunflower. I decided to add a thin strip of black cardstock at the bottom of the blended area. I glued the card layer to a green card base to complete the project

Hope everyone enjoyed this clean and simple summer project. Make sure you check out White Rose Crafts when looking for creative crafting supplies.