Showing posts with label Copic Coloring. Show all posts

Thursday, April 15, 2021

Pharmaceutical Chemist

Hello! Alison Heikkila here. I have a new mixed media card to share with you today for the White Rose Crafts Shop. I started off with a monoprint that I made on my 3" x 5" Gel Press during a FB Live, and was inspired to pull out the Steampunk Alchemist from AALL & Create once again.

The monoprint was made with a few colors of Golden Fluid Acrylics and the Heapza Hexagonz from AALL & Create. The green used on the stencil is what inspired me to give the alchemist his velvety green coat. I stamped him with Rich Cocoa Memento ink and then I colored him with Copics.

I tore the edges of my monoprint, but the white edges were too...white, so I applied some Antique Linen Distress Ink reinker to those edges with a brush, and it dulled it down perfectly. I used the reinker because I wanted those edges really saturated. I ink smooshed Ground Espresso Distress Oxide all over my card base for some interest. I popped up my chemist with foam tape and decided I needed another element. So I stamped out and colored one of the bottles from the Steampunk Alchemist set and tucked it underneath him. I had some old Tim Holtz Halloween stickers laying around, and that's where my sentiment came from.

I love how old all of the elements on this card look. It's a lot of fun to pull colors from monoprints to help you steer the direction of the rest of your projects. I'm finding that the Steampunk Alchemist stamp set is so versatile because it has a ton of stamps in it. It's just fun to experiment with them all (pun intended). Please head over to White Rose Crafts to check out the thousands of items they have. Be sure to use my code, “Alison15” to save 15% off of your purchase. And, hang out with us in the White Rose Crafts Gallery on FB! Thanks so much for stopping by. Have an inspiring day!

Wednesday, September 25, 2019

Love Muffin with Guest Designer Meghan


Hi Crafty Friends,
It is Meghan and I have had SO MUCH FUN Guest Designing for White Rose Crafts these past two months. This is my LAST post but hopefully they will have me again! I love this little stamp set because my dad calls me "Meghan Muffin" because I make muffins all the time!

Make Crafty Friends Q & A:
Q: Do you like muffins? What are your favorite?
A: Me? YES! I love making mini muffins and my favorite is Pumpkin Protein!


I started my card using this cute paper pack from White Rose Crafts Doodle Bug Design called Puppy Love. I used it for my panel. And the red heart stripe across the lower part of my card.

I colored my muffins to match all the colors of my heart using Copic markers and cut them out using the White Rose Crafts Your Next Stamp Love Muffin Die.


 I mounted the muffins on the card across the bottom taping three of them down flat and popping up the orange and teal one. I then die cut a stitched flag banner die for my sentiment.

 I finished my card by stamping the LOVE muffin and Have a Sweet Day! sentiments.


Supplies:

Wednesday, July 24, 2019

You're Fin-tastic! with Guest Designer Adam


Hello Fellow Card Makers,
Adam here, sharing a fun card using the White Rose Crafts challenge theme of “water”. I find working with a challenge theme is fun and causes me to push myself to come up with new ideas.
All my supplies can be found on the White Rose Crafts site.

Supplies: Lawn Fawn – Manatee-rific Stamp Set
                Your Next Stamp – Fishy Fun
                Tim Holtz Oxides – Tumbled Glass, Peacock Feathers, Salty Ocean
                Masking tape/paper
                Nuvo Crystal Drops – Silver Moon Dust
                Ranger Super Fine Embossing Powder- White


Starting with a layer one piece of white cardstock, I blended the three Oxide inks in a masked oval. I then flicked water drops onto the blended ink creating water texture.

I then stamped the manatees and sea vegetation in Memento black ink from the Lawn Fawn Manatee-rific stamp set. All of these pieces were cut out and colored using ink markers.

I cut a banner from a piece of blue cardstock to match the card base. I scored the banner to allow for folding the banner and give it dimension. I embossed the sentiment from the or folding the banner and give it dimension. I embossed the sentiment from the Your Next Stamp set – Fishy Fun in Ranger Super Fine Embossing powder – white. I then folded the ends to form the banner and attached it to the card layer below the blended oval.
I attached the manatees to the edges of the oval and the sea plants and sand to the center bottom of the oval. The final step was to add Nuvo crystal drops in silver moon dust to the water to create bubble like spots.

I hope you are happily creating water themed cards along with us at White Rose Crafts. I want to thank White Rose Crafts for allowing me to share my creations with you on their site. I have enjoyed being a guest designer these past two months. I hope you have enjoyed my cards. You can see more of my creations at Instagram.com/ARK513

Wednesday, June 19, 2019

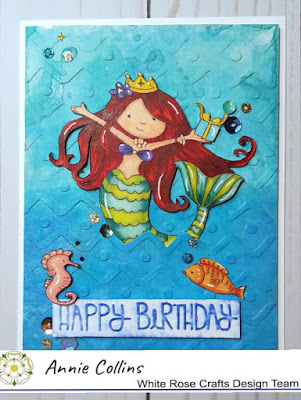
Happy Birthday Mermaid Card

Hello Crafty Friends - Annie here with a fun card using embossing folders and an adorable mermaid stamp from Wild Rose Stamps.

If you haven't seen Design Team Member Alison's FB Live Embossapoolza Part 1 - You really need to check it out. 

Now, In keeping with her tutorials - I created this card.


As always - I start by stamping and coloring my images. I fussy cut them and colored the edges with the Memento marker. Then set them side. Next, I trim all my card pieces and grab two embossing folders.

I started by dying an A2 Card front panel of white cardstock using Distress Oxide in Broken China. I did the direct to the paper method and then sprayed some water that has a bit of perfect pearls mixed in. I heat set it.


Once the cardstock panel was dry I used the embossing folder. I then added some Distress Oxide in Mermaid Lagoon and some Distress Oxide in Blueprint Sketch watering them down with the perfect pearls mix for some shimmer.


Next, I embossed the sentiment and did the direct to paper technique with Distress Oxide Blueprint Sketchand did again a spray with the perfect pearls water mix.
 

Now, for assembling the card. I gathered all the card components and start by using the precision knife to cut into one of the waves so that I could tuck the mermaid. Then, I added some foam adhesive to the mermaid and placed her onto the card front panel. Next, I added foam adhesive to all of the card front panel and adhered it to the card base. I then adhered the sentiment and seahorse with some foam adhesive and I adhered the fish directly to the card front panel. 


Finally, I added a few sequins from Doodles Paper Playground and the card is complete!

Materials Used:
Memento Pen - Tuxedo Black
*(Please note that I used two folders from my stash.
 However, White Rose Crafts LLC carries a variety of embossing folders)
Sakura Gelly Roll Pens -Metallic Gold, Black & White
Recollections Brand Heavy Weight White Cardstock
Copic Markers: R59, BV17, BG72, BG09, G21, B00, & B01
Spectrum Noir Markers: CR10, DR1, HB1, CT4, GY4, 
BT3, CG1, CG2 MG1, CRI, & BO1,

Thank you for stopping by the blog today - I hope you found some inspiration!

Be sure to tag us White Rose Crafts LLC on social media 
if you create a project with products or kits purchased on the 

Tuesday, June 18, 2019

You make me Happy- a card by Guest Designer Adam


Hi All,
Adam here with another super fun card made with a Your Next Stamp – Humming By stamp set.  All my supplies are readily available at White Rose Crafts.  They are promoting summer themed cards for the month of June. I chose to create with a hummingbird and sunflower because I know summer is upon us when I see my first hummingbird.
I like to start by letting you all know what supplies are needed to create the card I am working on today.  They are:
     Masking tape/sheets/post-it notes
     Tim Holtz Oxide ink – background colors of choice (Squeezed Lemonade, Spiced      
     Marmalade, Ripe Persimmon)
     Black ink for image stamping such as Memento Dye Ink in Tuxedo Black
     Copic Markers/coloring medium of your choice in colors of your choice
     White, green and black cardstock
     Glue and Double sided tape
     Sequins – Doodles Paper Playground Limited   

First, I stamp images to be colored on white card stock. I cut out the images and color them using Copic Markers.

The next step is masking the layer one (4” x 5 ¼”) white card stock in preparation for ink blending.  I like to use the upper 2/3rds of my design space on the card because this follows the rule of thirds. With this in mind I taped off two thin stripes and a larger strip.
Using three colors of Tim Holtz oxide that felt like summertime to me, I blended light to dark onto the card.  (Squeezed Lemonade, Spiced Marmalade, Ripe Persimmon)
Now it is time for the assembling of the card.  I used double sided tape to adhere the sunflower and foam tape to pop the hummingbird to the blended area.  Using black ink I stamped the sentiment from the stamp set under the blended area. Added a few Doodles Paper Playground Limited   sequins and thought I was finished only to decide it needed a grounding effect for the sunflower. I decided to add a thin strip of black cardstock at the bottom of the blended area. I glued the card layer to a green card base to complete the project

Hope everyone enjoyed this clean and simple summer project. Make sure you check out White Rose Crafts when looking for creative crafting supplies.