Tuesday, July 31, 2018

Featured Design Team Series: Back To School Planer Layout by Laura Wolff

Back To School Planner Layout
By Laura Wolff

This week at White Rose Crafts we have a new theme, and one that I am in denial about.....school.


This week everything school related is on sale!  I used Woodware School Tots for my planner pages. Our youngest starts preschool soon and this adorable stamp set was perfect to set that week off. I also used some paper from the Simply Creative Mankind paper collection. I had to sprinkle some But First, Coffee Sparkle Blends on the top because I have a few things penciled in already and hey, school calls for coffee, right?! Anyway, here is a look at my planner. 


Aren't these guys just adorable! They sure do make going back to school fun!! 

~~~~~~~~~~~~~~~

Thanks for stopping by!
Happy Crafting!

Sunday, July 29, 2018

Featured Design Team Series: Graduation Shaker Card by Donna Coughlin

Graduation Shaker Card
Hawthorne Hills
By Donna Coughlin

Hello everyone, Today I made these two graduation cards for the White Rose Crafts Design Team. I used the Aspire Pure gold and Silver ore cardstock. This week we are celebrating "School is Cool". Since I have two graduations in 2019 this was the perfect time to get a head start on graduation cards.


The tassle I made with DMC thread, if you need instructions on how to make this (they are really easy) just google tassles. The alphabets are Woodware UK Dazzle Sheet - Gold Lower Case Alphabet and is also sold at White Craft.


This second one I used the Silhouette Cameo to cut the stars and the date and using a page protector and the Fuse I made the large star that is in the center and the medium size black star in the lower left hand corner of the card I used. Once again I filled the stars with Doodles Paper Playground: Sparkle Blends - Shooting Star For the date and the silver stars I added Dovecraft Glitter Glue Silver. I used the ASPIRE Petallics Silver Ore Card Stock - 8 1/2 x 11 in 98 lb Cover Metallic.


Thanks for stopping by today!
Donna Coughlin

~~~~~~~~~~~~~~~

Thanks for stopping by!
Happy Crafting!

Saturday, July 28, 2018

Featured Design Team Series: School's Cool by EK Gorman

School's Cool
By EK Gorman

It is time for a new theme week over at White Rose Crafts.  With school being more or less a month away for children, WRC is getting ready to go back to school, because lets be honest,
"School's Cool".

Schools Cool

Is it notes for teachers, new school year albums, or just sweet little letters for your darlings?  What Back to School Projects do you need to work on?

White Rose Crafts has a whole assortment of back to school crafting projects to help you with your paper crafting needs.

Today, Design Team member EK, from ekgorman here today to share some quick and simple Lunch Box Notes for my students today.

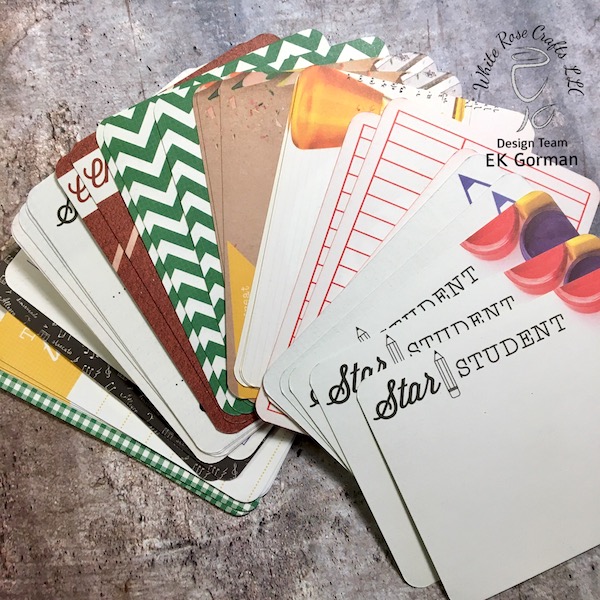
Instead of cutting scoring cards to fit my needs, I instead invested in a pack of 48 precut, double sided school theme cards from Kaisercraft.  The School Days 3x4 cards are perfect for my needs.

EK Gorman, White Rose Crafts e

You see I like to tuck little notes into my three kids lunch boxes three or four days a week just so they can find a little surprise.  What that means is I have to have lots of little decorative note cards ready to go (times three).  The School Days paper pack has 16 different designs, with three of each design in the pack.  Which makes it perfect for my family.  The cards can be used just as they are, with a little hand written note, or spiced up with some stamping.

EK Gorman, White Rose Crafts b

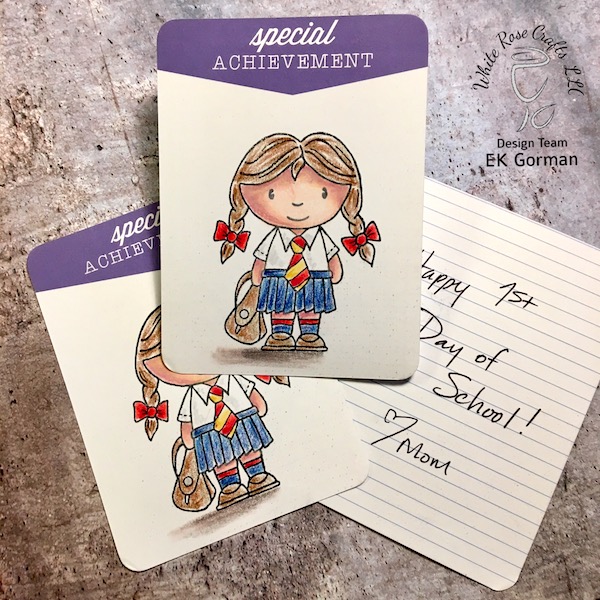
In the case of these three cards I pulled out the Woodware UK School Tots stamp set to spice up the lunch box notes.


I stamped out each of the images three times (once for each card) and then using my colored pencils (alcohol markers would leak through these cards) colored in the images.

EK Gorman, White Rose Crafts c

Then I added a simple hand written note to each of the nine cards.  Now I am ready for the first week of school for my little students (who don't happen to be so little anymore).

EK Gorman, White Rose Crafts d

What traditions do you do with your kids or grandkids at the beginning of the school year?  Make sure you share your projects with White Rose Crafts over on their Facebook Gallery.

~~~~~~~~~~~~~~~

Thanks for stopping by!
Happy Crafting!

Friday, July 27, 2018

Featured Design Team Series: Candy Machine Shaker Favor Cards

Candy Machine Shaker Favor Cards
By Amber MacMurtry

Good afternoon Rosies! Amber here, taking over the White Rose Crafts blog, today! I've got a set of Candy Machine Shaker Favor Cards to share with you today! I used tons of products available at WRC for these simple, but completely cool cards!


I started with a pack of Jillibean Soup Small Circle Shaker Cards and matching Shaker Pouches, the Jillibean Soup Sweet Treat stamp set & a selection of Distress Oxide Inks in Candied Apple, Wilted Violet, Salty Ocean, Spiced Marmalade, Picked Raspberry & Mowed Lawn. I stamped the candy machine base and top around the shaker card openings in each of the Oxide colors. You'll notice how I never show the card I created in Candied Apple again...well, that's because I smudged it beyond recognition right after I took the next photo. Oops. We won't dwell on that now. Sigh.


Next I colored in parts of the candy machine base images using my Kelly Creates Metallic Jewel Brush Pens, to give them a little shine. I stamped the "Sweet Treat For You!" sentiment using Versafine Clair Medieval Blue ink. Clair inks have been my favorite for sentiments lately because, being a pigment ink, they produce beautiful, crisp impressions every time, even with acrylic stamps (like those from  Jillibean Soup), and they dry much faster than other pigment inks. 


Next, I selected some geometric and plaid patterned papers that I thought coordinated well with the images & cut out 2 panels of each, measuring 4x5.25 inches, plus a strip measuring .5-.75x3.75 inches. I adhered the skinny strips beneath the candy machines, to ground them. Then I adhered one the 4x5.25 inch panels, centered inside each of the cards, and layered them with a panel of white cardstock, measuring 3.5x4.75 inches. I took the second panel of coordinating patterned paper and temporarily adhered it to the back of the cover of my card using washi tape. I lightly traced my shaker opening with a pencil & removed the paper from my card. Next I used a Tear Strip die from my stash and some partial die cutting to cut a short tear strip on each of the panels inside the pencil circle. 


I added double sided tape to the patterned side of the paper, being careful to avoid my pencil circle. Once my tape was applied I erased my pencil circles. Then, I took the Jillibean Soup Small Circle PVC Shakers and popped them through the shaker card openings & filled them with chocolate candies, before adhering my patterned panels of paper to the back, securing the shaker pouch and candy in place, and making sure the tear strip was behind the pouch so my recipient has easy access to their sweet treat!


I hope you enjoyed these cards. You'll notice I promptly forgot to take any more process photos after the first one (that I smudged the card), because I got frustrated--but I'll try to do better next time.

Additional Supplies:


~~~~~~~~~~~~~~~

Thanks for stopping by!
Happy Crafting!

Wednesday, July 25, 2018

Product Highlights #9 - August Card Kit Reveal & Pre-Order

Good morning Rosies! Its that time again!! 

Our limited edition August Subscription Card Kit is available for pre-order, right now!!

We have experienced a surge in subscription sales, recently, so we only have a handful of kits left to sell a-la-carte. If you love it as much as we do, make sure you get your order placed right away!


These kits are a spectacular value, including 2 stamp sets, a cutting die, coordinating papers, card blanks and lots of embellishments--a real bargain at just $29.50+shipping!
OR, if you want to be sure you don't miss a single kit,
Subscribe for 3 kits at a time, for the incredible price of just $74.99+free shipping! That's a savings of over $35.00! WOW!


16 - beautiful 6x6 Pion Legends of the Sea Collection papers, shipped as four 12x12 cut apart sheets (imported from Sweden)

1 - 12x12 sheet of cut-apart Pion toppers (imported from Sweden)

3 - A2 card blanks in coordinating colors, with envelopes 

1 - Jillibean Soup die cut Shaker Card & matching Shaker Pouch - Jar (based in the USA)

1 - Prima Marketing Seashore Stamp Set (based in the USA)

1 - Docrafts Papermania Tall Urban Stamp Frames Stamp Set (imported from UK)

1 - Docrafts X-Cut mini decorative Anchor Die (imported from UK)

1 - exclusive mini Doodles Paper Playground: Sparkle Blends Nautical Legend (With Love from Vermont) 

1 - ScrapBerry's Light Brown Pigment ink cube (imported from Poland)

3 - Scrapberry's metal charms (imported from Poland

4 - Kaisercraft Wood Veneers (imported from Australia)

1 - Kuretake Zig Blue Wink of Stella Brush Marker (imported from Japan)

6 - K & Co glittered dimensional seashell stickers 

1 - package of real seashells (collected in the USA)

3 - Gorjuss frames (imported from UK)

1 yard each - Natural & Light Blue Raffia

1 yard each - Ivory, cornflower blue & sage green satin ribbons in varied widths


Remember, all of our subscription kits are strictly limited edition! We only have a handful of August kits left & when they're gone, they're gone--so order yours now!


~~~~~~~~~~~~~~~

If you love the beautiful, vintage look of this month's nautical themed kit, you'll be happy to know our April Patchwork of Life Subscription Card Kit is now on SALE for $24.50, to make room in our inventory for future kits! We have a very limited number of these kits remaining, so if you love it--now is the time to order! This beautiful kit also includes 16 6x6 papers from the Pion Patchwork of Life collection, a sheet of matching cut-aparts, 3 sheets of Petallics shimmer cardstock, one 4x6 stamp set, 2 Scrapberry's Stains ink cubes in Green & Pink, and a whole slew of beautiful coordinating embellishments, including an exclusive Doodles Paper Playground, mini Sparkle Blend, not available for individual purchase.


~~~~~~~~~~~~~~

If vintage isn't really your thing, we also have a few of our bright, bold & contemporary June Summer of Love Subscription Kits available for purchase, too! This kit is also an incredible value, including 2 4x6 stamp sets, 15 beautiful 6x6 papers, cut-aparts, a printed acetate sheet, Petallics shimmer cardstock, a Scrapberry's blue Stains ink cube, and TONS of coordinating embellishments, including an exclusive Doodles Paper Playground, mini Sparkle Blend, not available for individual purchase.


~~~~~~~~~~~~~~~

Thanks for stopping by!
Happy Crafting

Sunday, July 22, 2018

Featured Design Team Series: Donna Coughlin - Mermaid's Tail Layout

Mermaid's Tail Layout
By Donna Coughlin

Today I did this layout for White Rose Crafts LLC Design Team. Since we are celebrating summer this week I thought I would do this layout. We took our granddaughter to the beach last year and I took this photo of her sitting on the beach. With a little magic from Photoshop she turned into a mermaid! When I saw this Mermaid's Tail: Dolphin paper from Kaisercraft, I knew I had to do this layout. I cut the frame and the swirls going up the left hand side from the Silhouette.

To make the swirl look more magical I used a mix of
Around the frame I used various items from the ocean as well as metal pieces charms and a Kaisercraft wood veneer.


To make the mermaid on the paper sparkle a little I added 


Products used found at White Rose Crafts on this layout:

Thanks for stopping by
Donna

~~~~~~~~~~~~~~~~

Thanks for stopping by!
Happy Crafting!

Saturday, July 21, 2018

August Subscription Box Unboxing

Hey Rosies!!!   It's EK from ekgorman designs and I'm sneaking in not to share a project with your at all today...  No instead I simply have a little video for you to enjoy.

And it's Saturday, so that means it is time to announce White Rose Crafts newest themed week of awesomeness!!! 

This week however, we hate to inform you that....

"Something's Fishy Around Here"

And what's Fishy....

Well we are getting ready to explore and celebrate WRC's next Subscription Kit!!!  The August Subscription Kit centers around "Legends of the Sea"!  Want to know what's in this month's subscription box....Excellent.  

Instead of having a project today, I have an unboxing video sharing with you.  I am so excited to sit down and play with this kit.  I hope you are excited as I am!


Want to see the video in HD, click here:

Make sure you preorder your kit, because once they are gone...they are gone!

Friday, July 20, 2018

Featured Design Team Series: Seven Fairy Dust Cards by Amber MacMurtry

Seven Fairy Dust Cards
By Amber MacMurtry

Hello there Rosies! Amber here to round out our Putting the Paper Back in Papercrafting week, with a collection of eight cards I created with the stunning Fairy Dust paper collection from Kaisercraft and a few of my Doodles Paper Playground: Sparkle Blends. I created 4 shaker cards and 3 simpler designs to share with you today.


This Paper collection is absolutely beautiful in a feminine color palette of teal & purple that worked perfectly with the Fairy Dust, Lilac Luster, & Peacock Pizzazz Sparkle Blends. I love that it includes sheets of tags and sentiment panels, as well as 12x12 sheets of gorgeous paper, all at an affordable price!


Although I didn't order them for this set of projects, the Kaisercraft Fairy Dust collection also includes a pack of coordinating die cuts, a lovely Stamp Set, a Die Cut 12x12 glimmer cardstock sheet & a 12x12 sheet of sticker borders and sentiments.


For my first card I channeled my inner Jennifer McGuire and cut a 4 x 5 1/4 inch panel of this beautiful Enchanted paper and used a kraft knife to cut out the white space, creating a faux laser cut look. I used my score board to score a hinge and mounted the panel on an A2 seafoam panel of cardstock. I cut two smaller panels, one white and one seafoam to mount inside the card so I would have a hidden place to write my message. I cut a sentiment from the text print Flutterby paper & mounted it on purple cardstock before popping it up with 1mm Woodware mounting tape.


~~~~~~~~~~~~~~~

For my second project, I chose a 4x6 panel from the Stardust cut apart sheet. I used my kraft knife to cut out the center of the oval design, mounting it in the center of a landscape, white A2 card. I cut a piece of acetate transparency and mounted it on the back of the frame panel. I selected the Lilac Luster Sparkle Blends and placed a generous amount to the center of the decorative oval & used 3mm Woodware Mounting Tape to pop up the panel & attach it to my card base. For a final touch, I cut out one of the sentiment banners and fussy cut a butterfly from the foiled Flutter cardstock and adhered them in opposite corners, before adding some Dovecraft Crystal Glitter Glue. On the inside, I trimmed down one of the cut apart sentiments from the Fairy Wishes cut apart sheet.


On the inside, I trimmed down one of the cut apart sentiments from the Fairy Wishes cut apart sheet.


~~~~~~~~~~~~~~~

For my third card, I selected another of the sentiment panels from the Stardust cut apart sheet & cut it to 5x5 inches. I mounted it on a 5.25x5.25 panel of teal cardstock using 1mm Woodware Mounting Tape and mounted the whole panel to a 5.5x5.5 white, top fold card base. I fussy cut one of the fairies and a butterfly from the foiled Flutter cardstock and mounted them with 1mm foam tape. I added a touch of Dovecraft Crystal Glitter Glue on the wings of the fairy & the butterfly. I cut out the bracket tag sentiment panel from the Stardust cut apart sheet, mounting it in the center of a panel of lavender cardstock, before adding it to the inside of my card.


I cut out the bracket tag sentiment panel from the Stardust cut apart sheet, mounting it in the center of a panel of lavender cardstock, before adding it to the inside of my card.


~~~~~~~~~~~~~~~

For my fourth card, I selected another of the sentiment panels from the Fairy Wishes cut apart sheet, and used my craft knife to cut out the bracket panel in the center, carefully cutting around the fairy image. I mounted a 4 7/8x4 7/8 panel of the reverse side of the Sparkly paper, and placed a generous amount of Fairy Dust sparkle blends in the center. I added acetate to the back of my front panel and popped it up using 3mm foam tape. I cut out and mounted a sentiment banner, and one of the flowers from the Enchanted paper and mounted them using 1mm foam tape. 


On the inside, I added a panel of white cardstock, and cut apart the sentiment I'd cut out of the center of the panel on the front. Finally, I added a fairy I fussy cut from the foiled Flutter cardstock and mounted it on the left of the sentiment to cover up the notches where the fairy had been cut out.


~~~~~~~~~~~~~~~

For my fifth card, I chose another of the panels from the Fairy Wishes cut apart sheet & fussy cut the bracket portion. I used my kraft knife to cut out the center rectangle with the fairy image, and mounted it on the center of a top folding, landscape A2 card base. I placed a generous amount of Peacock Pizzazz Sparkle Blends in the center of the panel. Then I adhered a panel of acetate to the back of the frame and mounted it over the sequins with 3mm foam tape. I cut one of the banner strips from the edge of the paper, mounted it on purple cardstock and adhered it to the bottom of the shaker, using 1mm foam tape. I fussy cut 4 butterflies and adhered them in the corners, with their wings popped up. Finally, I added glitter glue for sparkle.


On the inside, I cut apart another of the sentiment banners from the barcode edge of a sheet of paper, trimming it into three lines, short enough to fit inside the card, and mounted them on a scrap of the patterned paper and then a piece of teal cardstock. I mounted that whole thing on a panel of lavender cardstock, edged at the top and bottom with thin scraps of another pattern. I added the whole panel to the inside of my card and embellished it with more fussy cut butterflies.


~~~~~~~~~~~~~~~

For my sixth card, I cut a 5.25x5.25 panel of the Pixie paper and mounted it on a 5.5 inch square card base. I adhered one of the fussy cut fairies from the foiled Flutter paper and several of the butterflies, alternating gluing them flat or using 1mm foam tape. I cut down one of the sentiments from the bar code edge strips, and cut fish tails at one end, adhering it with 3mm foam tape. For added sparkle, I embellished the fairy & butterfly wings with Glitter Glue.


For the inside, I cut a panel of teal cardstock, and topped it with the back side of the Dew Drops paper, leaving just a thin border of teal. I cut down the other half of the sentiment from the front of the card, adhered it with double sided tape, and added two of the fussy cut butterflies as a finishing touch.


~~~~~~~~~~~~~~~

For my final card of the day, I selected one more of the panels from the  Fairy Wishes cut apart sheet and fussy cut the scalloped circle. I used a circle die from my stash to cut out the sentiment in the middle, and set it aside. I cut a 5.25 inch square panel of the Flutterby paper and adhered it to a pale aqua 5.5 inch card base. I added a circle of acetate to the back of the scalloped frame, and used a double layer of Fun Foam to create my shaker box, using two dies from my stash. I added a generous amount of the Fairy Dust Sparkle Blends to the center of the panel, and added my frame. I trimmed down one of the sentiments from the bar code edge of the paper and adhered it at the top of the shaker. Above that, I adhered a crown image, fussy cut from the foiled Flutter paper, as well as a few butterflies and one of the fairies. I added Glitter Glue to the fairy and butterfly wings, and used Sea Breeze Nuvo Jewel Drops on the crown as jewels.


To finish the inside of my card, I took the center I had cut out of the frame I used for the shaker and adhered one of the fussy cut crowns to the top, and a little butterfly as embellishments.


~~~~~~~~~~~~~~~

I hope you enjoyed these projects as much as I loved making them. I don't often craft without stamping, but I found this collection to be versatile and inspiring to use. I still have lots of it left, so expect a follow up with more designs some time in the future!

~~~~~~~~~~~~~~~

Thanks for stopping by!
Happy Crafting!