Wednesday, October 28, 2020

Hello Pumpkin Fall Card

Hello Crafty Friends - Annie here with a fun Fall card featuring products from White Rose Crafts LLC


Video Tutorial

Supplies Used: 

Other Supplies Used: 
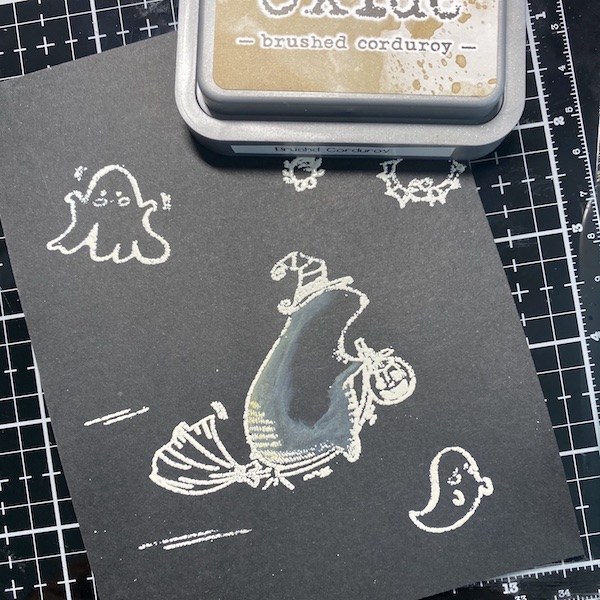
Copic Markers: BG11, BG23, BG32, E33, E35, 
Y32, YR02, YR09, W00,W1, & W3 
Recollections Brand 110# Cardstock: Brown 
Recollections Brand 65# Corrugated Cardstock: Kraft 
Recollections Brand 65# Cardstock: Cream 

Thank you for stopping by the blog today. I hope you found some inspiration!

White Rose Crafts Design Team Member Annie Collins 

Blog: https://littlewingscreates.blogspot.com/ IG: @anniec09

Monday, October 26, 2020

Halloween Embossing

This image has an empty alt attribute; its file name is img_e1303.jpg

Hey Everyone. It's EK and today I thought I would try something a little different today while creating a halloween card. While this is not a new technique, it is not one I often play around with. Today I thought I would try embossing some halloween stamps onto black cardstock and then use ink to add color. I pulled out some Waffle Flower stamps and Spellbound paper I picked up at White Rose Crafts for this card.

This image has an empty alt attribute; its file name is img_e1297.jpg

Step One: Trim a piece of black cardstock to 4.25x5.5 inches. Using the Boo stamp set and Ranger Super Fine White Embossing Powder, I stamped the images and embossed them.

This image has an empty alt attribute; its file name is img_e1298.jpg

Step Two: Using Brushed Corduroy Distress Oxide and a waterbrush, add shadowing to the bear 'witch'.

This image has an empty alt attribute; its file name is img_e1299.jpg

Step Three: Using Carved Pumpkin, Twisted Citrus, Wilted Violet and Chipped Sapphire Distress Oxides blend inks over the entire card.

This image has an empty alt attribute; its file name is img_e1300.jpg

Step Four: Spray the entire card with Frost Sheer Shimmer spray.

This image has an empty alt attribute; its file name is img_e1301.jpg

Step Five: Adhere the black cardstock to a piece of 6x6 inch printed cardstock from the Spellbound Fancy Pants paper pack. Pull out a sheet of Lawn Fawn Sparkle Cardstock and trim four pieces to a quarter of an inch. Surround the black embossed cardstock with it. Trim off excess sparkle cardstock that hangs off.

This image has an empty alt attribute; its file name is img_e1302.jpg

Step Six: Stamp a sentiment onto some white cardstock. I used a sentiment from the Woodware Halloween Fun stamp set. I also used some Distress Pens in coordinating colors to help highlight the inks blended into the cardstock. Adhere the sentiment banner onto the card. Using some Nuvo Drops in Auburn Pearl Crystal Drops.

This image has an empty alt attribute; its file name is img_e1304.jpg

Do you try different techniques when making different holiday cards? Let me know in the comments below.

This image has an empty alt attribute; its file name is img_e1305.jpg

Until then, Happy Crafting!

Wednesday, October 14, 2020

Silver Bells in the City

Hello! Alison here. Each month, my family and I sit down for a few hours in the dining room and make cards using Sparkle Blends from Doodles Paper Playground and other fun supplies. We were off to a late start this month, so we only had our Family Crafty Time on Monday, since there was no school. Today's project was made by my husband, and I LOVE what he made. He was planning on making a card, but it morphed into more of a home decor piece. It's now about 7" x 7."

When he was figuring out what to do and he saw the Silver Bells Sparkle Blend, he quickly thought of creating a city skyline. I have a really old stamp set from Stampendous that was designed by Nat Kalbach that was perfect for what he was envisioning because not only are there multiple stamps, but a cool stencil too. He made the back layer of the city first, by tracing one of the stamps in the set and cutting it out. Then he used Chipped Sapphire Distress Ink and Mustard Seed Distress Oxide with the accompanying stencil to create windows. I love how it looks like some of the windows are lit.

His top layer was done with a lighter gray cardstock, and he stamped the sketchy city with VersaMark ink and embossed it with Detail Silver Embossing Powder. Then he applied Black Soot Distress Oxide just on the edges of the skyline to deepen the color a bit. He buffed off the excess where it was on the embossing powder. He decided he also wanted to add snow, so he used a VersaMarker and scribbled it across the bottom of the cityscape and across the "street." He applied Sparkle Puff embossing powder and voila! Snowy banks.

Gene really loved the big silver bells in this Sparkle Blend, and they are really what inspired his entire project. He cut some black cardstock for his background and flicked on some Sheer Shimmer Spritz in Frost. Then he adhered his city layers using different heights of foam. Last, he placed on all of the elements from the Silver Bells Sparkle Blend, including the snowflakes, the stars, and of course the bells. He used On Point Glue for this.

It took Gene a bit longer to create this than he anticipated, but I thought he got it done pretty quickly considering all of the steps that were involved. We all love how this turned out, and I am looking forward to hanging it up over the holiday season. Have you seen the entire new release of Sparkle Blends yet? Head over to the Sparkle Blends Shop on Etsy to check them out. You can use my code, “ALISON10” for 10% off of your purchase, not including bundles. Thanks so much for stopping by. Have an inspiring day!


Tuesday, October 13, 2020

Great Paper Makes Easy Cards

This image has an empty alt attribute; its file name is img_e1230.jpg

Sometimes all you need to make a great card is simply some great paper. In this day and age of crafting layering inks, stencils and stamps over each other is all the trend, but sometimes you just don't have the time to work a background. That's when you need to simply pull out a piece of great paper.

This image has an empty alt attribute; its file name is img_e1227.jpg

If you haven't seen the Polish line 13 Arts paper over at White Rose Crafts, then you are simply missing out. This collection of papers are truly gorgeous and one of my favorites, Aqua Flora, has recently been restocked and available once again for pick up.

I have paired these stunning papers with a couple of whimsical stamps from AALL & Create to show how you can take a really series and beautiful paper with a sketchy artistic stamp.

This image has an empty alt attribute; its file name is img_e1153.jpg

I trimmed a piece of Aqua Flora paper to 4.25x5.5 inches and adhered it to an A2 card frame. Look at how stunning this paper is. That is literally just the paper. I have added nothing to it.

This image has an empty alt attribute; its file name is img_e1151.jpg

On a piece of watercolor paper, I then stamped out the AALL & Create Pirate stamp set using some VersaFine Ink. Using my Inktense pencils, I colored in the image trying to pull in the colors of the paper.

This image has an empty alt attribute; its file name is img_e1152.jpg

Using a water brush, I moved the ink around and let the image dry. Then I fussy cut out the image.

This image has an empty alt attribute; its file name is img_e1154.jpg

Adhere the fussy cut out image onto the Aqua Flora paper.

This image has an empty alt attribute; its file name is img_e1231.jpg

I added a strip of Lawn Fawn Sparkle Cardstock and stamped out the sentiment from the Pirate stamp set.

This image has an empty alt attribute; its file name is img_e1159.jpg

I was having so much fun that I create a second card using a more feminine palette of Aqua Flora paper. I trimmed the paper to 4.25x5.5 inches and adhered it to an A2 card frame. I also added another piece of Lawn Fawn Sparkle Cardstock to this card frame.

This image has an empty alt attribute; its file name is img_e1157.jpg

I stamped out this time the Super Girl stamp set from AALL & Create. I colored this image with Spectrum Noir Sparkle Glitter brush pens to color this image, trying to pull in colors from the card stock. I let it dry and fussy cut out the image.

This image has an empty alt attribute; its file name is img_e1228.jpg

I adhere the fussy cut image to the card and added a sentiment stamp from the Super Girl stamp set.

I hope you enjoyed seeing how simple it can be to make exquisite looking cards simply buy pulling the right gorgeous papers. The first time the Aqua Flora paper pack was in stock they sold out quick, so I imagine that this time around the paper set will be limited and quick selling too.

Let me know in the comments below which of today's cards are your favorite. Until then, Happy Crafting!

Thursday, October 8, 2020

Fall Planner Layout

 Hello,

Can you believe that it is fall already? We have had some cooler days and then back to hot and then back to cooler. Just like 2020, Mother Nature can't seem to make up her mind around here either! I used the Craft Consortium Over the Hedge Henry the Fox stamp set. I used the fern leaves on the date boxes and as a separation between my to do lists and the rest of my day. Henry the Fox is nestled into some grass inked with Peeled Paint Distress Oxide ink. I used colored pencils to color him in. Here's to some happy Fall planning! 


Friday, October 2, 2020

Enjoy The View - Double Page Layout

 Ahoy Mateys! Today I'm sharing a double page layout I made for my Disney World Trip in 2018. I'm still working on it! I wanted this particular page to look a lot less Disney and a lot more of a Piratey! White Rose Crafts is open again, so my monthly shopping has resumed and this month I selected the perfect Pirate paper collection by Craft O'clock Sea Stories.


Here are some Close Ups:


I made my own background paper by using my new KaiserCraft background stamp that I got. It is a super addition to my collection. If you missed my blog post on Creating Background go check it out, then you can buy the stamps at White Rose Crafts


KaiserCrafts Background Stamps:


I hope I have inspired you a tiny bit. Thank you so much for stopping by!