Showing posts with label embossing. Show all posts

Saturday, May 15, 2021

Altered Playing Card- Light Bulb

 Hello! Alison Heikkila here. I have been altering playing cards lately. It's a fun way to make quick projects, use up scraps, and try out techniques. For this altered playing card, I used 2 Gel Press print scraps that I had, that were too small to put on a card front, but they were also too nice for me to just throw out.

I had made both of these prints during a FB Live for White Rose Crafts. I used a gears stencil for these prints which has since sold out, but you can get a similar one from AALL & Create, called Steam Cogs. I used fluid acrylics from Golden and Deco Art Media too.

I pulled out the Steampunk Alchemist set from AALL & Create once again, and chose a lightbulb to put on the altered card. I stamped it with VersaFine Clair ink in Twilight, and then applied clear embossing powder so that it wouldn't smudge. The paint that's on the paper from the gel print makes the surface slick, so if you don't dry the ink, it could smudge easily. Using an embossing powder ensures that the ink is completely dry and won't move. I wanted to seal the edges of the playing card and add more texture so I used an ultra thick clear embossing enamel that I had in my stash and applied a few coats around the edges. It looks like water.

I really love those little green marquise shapes near the light bulb....they look like it's the light shining from the bulb, even though it was originally part of a cog. Altering these cards is fun and pretty fast, since there's not a lot of room to work on. Have you altered playing cards before? White Rose Crafts is going to be closing the shop for the summer, in preparation for a brand new website! Stock up while you can! Thanks for stopping by. Have an inspiring day! 

Thursday, February 18, 2021

Light the Way

 Greetings! Alison Heikkila here. Today I have a card for White Rose Crafts that uses some fantastic products from AALL & Create and Gel Press. I created this background during a FB Live that I did on my Alison Heikkila Designs page earlier this week. If you'd like to check it out, you can click HERE.

I cut down my chosen background and roughed up the edges a bit, plus inked them with Mermaid Lagoon Distress Ink. Next, I heat embossed the gorgeous Celestial Navigation stamp from AALL & Create and Silver Embossing Powder. I added a bit of Chipped Sapphire Distress Ink with a blending brush to darken some of the areas a bit to help the design show up a bit more.

I am so crazy about the light bulbs in the Steampunk Alchemist stamp set (I don't think I'll ever get tired of them), so I really wanted to use one here. I stamped it on Bristol and added a few sprinkles of Brushos and then spritzed it with water, which created the effect you see on the finished piece. I also added a sentiment from Heidi Swapp's Only You stamp set, and I inked the edges of the card base with more Chipped Sapphire.

I love the different styles of stamps that are on this card, the swirling colors on the light bulb and the background, and the texture. I think it's funky and I hope you like it too! White Rose Crafts has so many cool products, so I hope you’ll give them a visit. And, hang out with us in the White Rose Crafts Gallery on FB! Thanks so much for stopping by. Have an inspiring day!

Monday, October 26, 2020

Halloween Embossing

This image has an empty alt attribute; its file name is img_e1303.jpg

Hey Everyone. It's EK and today I thought I would try something a little different today while creating a halloween card. While this is not a new technique, it is not one I often play around with. Today I thought I would try embossing some halloween stamps onto black cardstock and then use ink to add color. I pulled out some Waffle Flower stamps and Spellbound paper I picked up at White Rose Crafts for this card.

This image has an empty alt attribute; its file name is img_e1297.jpg

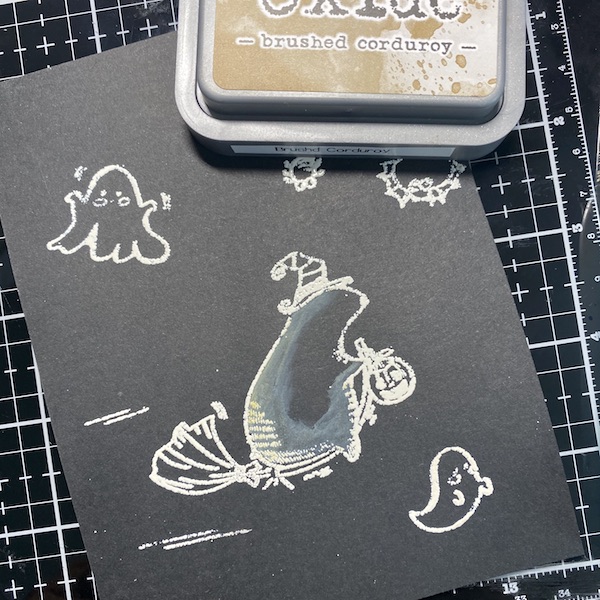
Step One: Trim a piece of black cardstock to 4.25x5.5 inches. Using the Boo stamp set and Ranger Super Fine White Embossing Powder, I stamped the images and embossed them.

This image has an empty alt attribute; its file name is img_e1298.jpg

Step Two: Using Brushed Corduroy Distress Oxide and a waterbrush, add shadowing to the bear 'witch'.

This image has an empty alt attribute; its file name is img_e1299.jpg

Step Three: Using Carved Pumpkin, Twisted Citrus, Wilted Violet and Chipped Sapphire Distress Oxides blend inks over the entire card.

This image has an empty alt attribute; its file name is img_e1300.jpg

Step Four: Spray the entire card with Frost Sheer Shimmer spray.

This image has an empty alt attribute; its file name is img_e1301.jpg

Step Five: Adhere the black cardstock to a piece of 6x6 inch printed cardstock from the Spellbound Fancy Pants paper pack. Pull out a sheet of Lawn Fawn Sparkle Cardstock and trim four pieces to a quarter of an inch. Surround the black embossed cardstock with it. Trim off excess sparkle cardstock that hangs off.

This image has an empty alt attribute; its file name is img_e1302.jpg

Step Six: Stamp a sentiment onto some white cardstock. I used a sentiment from the Woodware Halloween Fun stamp set. I also used some Distress Pens in coordinating colors to help highlight the inks blended into the cardstock. Adhere the sentiment banner onto the card. Using some Nuvo Drops in Auburn Pearl Crystal Drops.

This image has an empty alt attribute; its file name is img_e1304.jpg

Do you try different techniques when making different holiday cards? Let me know in the comments below.

This image has an empty alt attribute; its file name is img_e1305.jpg

Until then, Happy Crafting!

Friday, July 19, 2019

Sea Dreams Card

Hello Crafty Friends - Annie here with a fun and quick embossed mermaid card.

I used a Laser Cut Chipboard as my main focal point along 
with an inked background to create this card.


Let's get started.

I inked the chipboard mermaid with some Distress oxide in Blueprint sketch. I wanted to emphasis the silhouette but, I didn't want black. I then covered the inked mermaid with Ranger Clear embossing powder and heat set it. I set it aside to cool.


Next, I focused on the background. I used Strathmoore Bristol Smooth cardstock and several 
Distress Oxide inks in Blueprint Sketch, Wilted Violet, Broken China, Cracked Pistachio, Carved Pumpkin, Fossilized Amber and Worn Lipstick. To create a sunset. I set it aside to dry while I worked on the sentiment.

For the sentiment - I used a VersaMarker and traced the Cut Apart words from the Mediterranean Dreams Kit.  First, I used the Anti-Static bag and then trace the letters. I covered the letters in Ranger Clear embossing powder and heat set it. I set it aside to cool - while I cleared up my space to create the card. 
  

Now, I gathered all the components of the card. The embossed mermaid, the embossing sentiment, background panel, and a layering panel of dark blue cardstock. I start by adhering the background panel onto the blue cardstock panel. Next, I add both foam and liquid adhesive to the back of the mermaid. I center the mermaid making sure to get some of the sea and sky in her circle.
Then, I fishtail the sentiment banners and add some foam adhesive to the back of them and add them to the card panel.  


Finally, I added some Doodles Paper Playground Sparkle Blend: Tropical 
from the Mediterranean Dreams Kit to create a little bluff for the mermaid.
 I also added a few by the sentiment.

The card is now complete.

Materials Used:
 Scrapberry Cut Apart Topper Sheet 2 Sentiment 
Doodles Paper Playground Sparkle Blend: Tropical
VersaMarker Embossing Pen

Thank you for stopping by the blog today - I hope you found some inspiration!


Be sure to tag us White Rose Crafts LLC on social media 
if you create a project with products or kits purchased on the 

Thursday, May 30, 2019

You are my Person

Hello! Alison here. I've got a new project for White Rose Crafts today. If you visited my blog yesterday, you may realize that this card uses the exact same color palette as yesterday's card, but the design is very different. I love these colors together, and I have been super inspired by Therm O Web's Rainbow Shattered Glass Deco Foil, so this card was inspired by that.
I started off with the Gina K Designs Sweet Expressions Foil Mates. These are black toner-printed sentiments that you run through a hot laminator with the Deco Foil of your choosing. It's a very quick process with very impactful results.
Here you can really see the vibrant colors of the foil. I matted the sentiment with some deep purple cardstock. For my background, I used the Argyle Embossing Folder from Darice, but with a letterpress feel. I inked one side of the folder with Broken China, Wilted Violet, Worn Lipstick, and Peacock Feathers Distress Oxide before I ran it through my die cut machine. I was careful to not have any gaps between colors, but to also not contaminate any of my ink pads with the color next to it. If that happens, you can quickly wipe off the pad with a paper towel or cloth to keep the "wrong" color from seeping into the pad. I spritzed my cardstock with a little water because it's a heavy 110 lbs, and that keeps it from cracking in the folder. This also helped to blend the colors a little while it passed though my die cut machine.
I mounted the panel on to a white top folding card and added a few assorted sequins from various Sparkle Blends from Doodles Paper Playground that were adhered with On Point Glue. The photo below is a little blown out so that you could really see the amazing colors from the Deco Foil. It's even more amazing in person.
I love using embossing folders for backgrounds, and Foil Mates make for quick work of finishing off cards. If you eliminate the time you need to heat up your laminator, you could probably complete this card in well under 15 minutes. That's a win in my book! Please be sure to visit White Rose Crafts to check out many of the products I used today. Thanks for stopping by. Have an inspiring day!

Thursday, May 9, 2019

St. Thomas Layout

Hello! Alison here. I've got a new scrapbook page to share with you for my latest Design Team project for White Rose Crafts. Each month, we feature a specific company for about a week, and this time, it's Kaisercraft. I have loved Kaisercraft for a very long time. In fact, back when I owned my scrapbooking store, they was a company I ordered from frequently. This layout today uses a bunch of their newest products.
 This photo is of my husband, about 3 years ago when we went on a cruise. This photo was taken in St. Thomas. I love the colors and textures in the photo, and I knew I wanted to create more layers, textures and add in similar colors to my layout.
I first used Kaisercraft's Greenhouse paper pad as a jumping off point. That gave me some ideas on what to do with colors and other elements. I have the Greenhouse Clear Stamp Set and I used the terrarium image with Rose Gold embossing powder to create a geometric design in the lower right corner. I love how it turned out.
I knew I needed some color. Stains or drips of color. So I broke out my Distress Oxides in Tumbled Glass, Antique Linen, and Iced Spruce. I added the color in a few ways, but mostly by dipping the layout into watered down inks that I put on my glass mat. I got some really great drips that I think help your eye move around the page. Those 3 Oxides work beautifully with the Greenhouse collection.
I needed some shine, and to break up that upper left corner. So I used Kaisercraft's Grunge Stencil along with some Nuvo Expanding Mousse in Worn Linen. I did not heat set it to make it expand. I wanted the crosses to remain thin and delicate.
I also added an element from the Greenhouse Collectibles Die Cuts. That "postage stamp" really adds to the idea that this photo was taken someplace other than where we reside. I popped it on to some dark blue cardstock, which I dripped some Rose Gold Metallic Mixatives (from Ranger). Talk about shine! It looks amazing in real life. I love how this scrapbook page turned out. It's filled with items of interest, has just enough color, and of course, the photo is the star of the show. Kaisercraft is definitely a favorite company of mine, and I always enjoy working with their products. You can get many items from them over at White Rose Crafts LLC. I'll be back soon with another project. Thanks for stopping by. Have an inspiring day!

Thursday, April 25, 2019

Embossing with Creative Medium

Hello! Alison here. Ever since I was an Artist in Residence with Imagine, I really enjoyed working with Creative Medium. It's thick, smooth, easy to work with, dries quickly, and comes in some really fantastic colors. To this day I love using this paste, and I am always happy with the results. I bring this up because this week, the White Rose Crafts team is sharing projects that have embossing. Embossing comes in many forms, heat, dry, wet....so you are sure to see a myriad of projects. But I chose to focus on "wet," so with Purple Iridescent Creative Medium as my embossing paste.
White Rose Crafts recently got in some fabulous new stencils from Kaisercraft. Big, 12" x 12" stencils that have 4 different designs on it. I actually plan on cutting mine down into 4 smaller stencils, so that they are easier to manage. The stencil I used is called Grunge, and it is right up my alley. I taped the stencil down to a Distress Oxide background I made a month ago, and applied the paste with a palette knife in a messy, inconsistent way. I didn't want that stenciling to look perfect, especially since my Distress Oxide background was so "messy."
The dried Creative Medium maintains a lovely milky finish, but with flashes of iridescence, depending on the color you choose. I love seeing the purple flash here and there on this card. I dried the paste with my heat gun to speed up the process, and because it causes the Creative Medium to bubble and pop, creating a fantastic texture. To top off the card, I added one of the Greenhouse Die Cuts from Kaisercraft, plus a sentiment from the Greenhouse Paper Pad.
For some additional sparkle, I added a few sequins from the Springtime Sparkle Blend. The colors in that Blend worked perfectly with the colors on the rest of the card. I adhered them with On Point Glue from Imagine. I love that this card may look like it took a lot of time, but it didn't. I didn't need to color, or fussy cut anything, and since my background was made previously, that made the whole process quicker too. What kinds of things do you do to help your creative process move a little faster? Please be sure to check out the rest of the WRC Team to see what kind of embossing they're doing this week. And then head over to the White Rose Crafts LLC shop to see what's new in store. Thanks for stopping by. Have an inspiring day! 

Thursday, March 21, 2019

Welcome Spring!

Hello! Alison Heikkila here. Winter has officially come to an end and I am ready to celebrate! So today I am sharing a card that screams Spring with one of my favorite stamps that is available at White Rose Crafts. It's the Hellebore from Stampendous, and yup, I've used this big, beautiful bloom before. It is a true favorite.
A couple of weeks ago, I did a Facebook Live in the White Rose Crafts Gallery group that showed some different techniques with Distress Oxide Inks. One of them was Ink Smooshing, with an embossed image, and coloring on top. This card was mostly made during that video. If you watched the video, what you didn't see was how i finished off the coloring of the Hellebore, and how I added some additional ink to the edges and the embellishments.
I had used some Gold Sheer Shimmer Spritz to help move and oxidize the ink while I was making the background. You can see all of the gorgeous shimmer and the flower has from it. To add color to the petals, I used one Zig Clean Color marker and a water brush. I also used one color for the stamens.
I added a simple pre-made sentiment from Kaisercraft's Bombay Sunset 6" x 6" paper pad and a few sequins from the "Amethyst" Sparkle Blend from Doodles Paper Playground. Adding some Seedless Preserves Distress Oxide to the edges really tied the background into the flower and gave the card more depth.
The techniques I used on this card are fun and pretty easy to do. It's great to this type of coloring on images that you may be intimidated to color. I think it turned out beautiful, and I hope you'll give it a try. Be sure to watch the Facebook Live to see how the background was created. And then, head on over to White Rose Crafts LLC to check out some of the products I used today.

Wednesday, February 20, 2019

Hello, Beautiful

Hello! Alison here. Last week, the White Rose Crafts team shared projects using products from Woodware. I decided to keep the party going by making this card. I used a stamp from the same Woodland Elements set that I used last week.
 I started off by coloring the stamped image with Zigs....very basic coloring, to give it more of a stained glass look. I fussy cut it out and then chose the rest of my elements. I used some orchid colored paper with a small leaf stamp in the Woodland Elements set and embossed it with Ranger's Rose Gold powder. Then I inked the edges a little with Seedless Preserves Distress Oxide Ink.
 I found paper with a small pattern in the Bombay Sunset 6 x 6 paper pack from Kaisercraft that was just perfect for my background. I cut it to 4" x 5 1/4" so that I had room to add more Rose Gold embossing powder directly on to my card base. I love the shine it gives off. My sentiment is also from the Bombay Sunset paper pack.
The colors on this card are very serene, and I can see using it for encouragement. Please pop over to White Rose Crafts LLC Shop to see what fun products have just arrived in store. Thanks for stopping by. Have an inspiring day!

Saturday, September 8, 2018

Embossapaloosa

Embossing

It's Saturday, so that means it is time for the start of another Theme Week over at White Rose Crafts!  This week, we are embossing upon embossing in a Emossapaloosa.

EK Gorman, White Rose Crafts a

Today, I, EK Gorman from ekgorman designs, am embossing over embossing to create some really fun textures.  Additionally, I thought I would go ahead and show you two looks with just one embossing folder.

EK Gorman, White Rose Crafts g

Using the Darice Embossing Folder Peacock and a sheet of Aspire Petallics Black Ore cardstock, I embossed the image onto the paper.

EK Gorman, White Rose Crafts h

Then using my VersaMark Watermark Stamp Pad, I gentled rubbed the ink over the embossed portions of the cardstock.  Then I added some Ranger Vintage Pearl embossing powder and heat set it.

EK Gorman, White Rose Crafts i

I also added some Creative Medium Iridescent Texture Paste in Turquoise through out the peacock's tail.

EK Gorman, White Rose Crafts j

Finally, I added some Sparkle Blend sequins in Peacock Pizzazz (obviously) to the tail.

EK Gorman, White Rose Crafts d

I added a sentiment from a Scrapberry stamp set just to finish off the card.  And I am just loving the embossing over the embossing here.

EK Gorman, White Rose Crafts e

The texture is just too cool!


EK Gorman, White Rose Crafts k

My second project features the inverse of the Peacock embossing folder on some Aspire Petallics Mountain Rose cardstock.

EK Gorman, White Rose Crafts b

Again, I rubbed theVersaMark Watermark ink along the raised areas of the cardstock and then heat embossed some Ranger Liquid Platinum embossing powder.

EK Gorman, White Rose Crafts c

I finished off the second card with a strip of Aspire Black Ore cardstock and white heat embossed sentiment from the sentiment stamp Whatnot Sentiment 4 from Your Next Stamp.


Make sure you pop over to the shop and see all that they have for your embossing needs!