Thursday, August 29, 2019

Five Fast Cards using the September "Vintage Rose" Subscription Kit, Part II

September Subscription Kit

Hey Friends!  It's EK and I am back today for the second part of my two part series where I create Five Fast Cards using the White Rose Crafts September 'Vintage Rose' Subscription Kit.  This is a limited edition paper crafting kit featuring supplies that invoke the final throws of summer in the rose garden.  For anyone who loves shabby chic or really just wants to experiment with the style, this kit is perfect for you.  It is limited edition, and in pre-sales right now.  It officially starts shipping September 1st, so do not miss out on the chance to own this stunning paper crafting kit.

EK Gorman, White Rose Crafts, September Rose FFC 2 k

If you missed the unboxing, click here to check it out.

If you missed the first part of this series, click here and check out the first five cards I crafted using the kit.

To watch the second part of the Five Fast Cards in HD, click here.


For a more detailed look at each of today's card, scroll down.
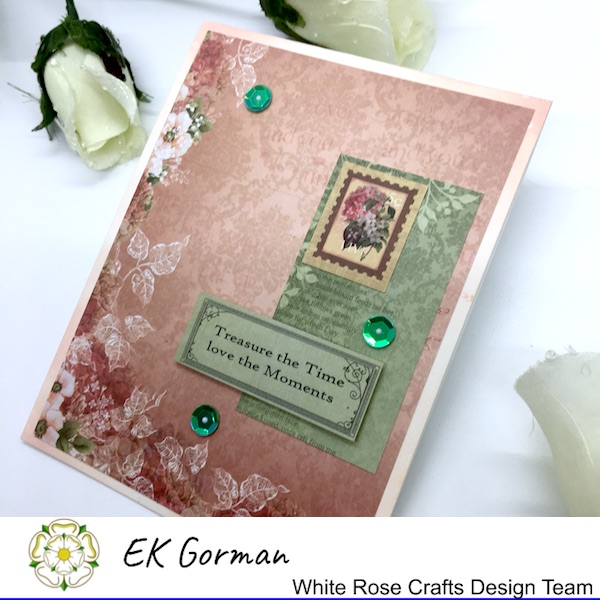
Card One

EK Gorman, White Rose Crafts, September Rose FFC 2 aCard One features one of the printed pieces of paper, five of the stickers from the included 12x12 sticker sheet, and a couple of sequins from the Sparkle Blend Sequin pack.

EK Gorman, White Rose Crafts, September Rose FFC 2 b


Card Two

EK Gorman, White Rose Crafts, September Rose FFC 2 c
Card two features three different trimmed pieces of printed paper, stamping from the included stamp set, stickers from the sticker sheet and two of the floral rhinestones.

EK Gorman, White Rose Crafts, September Rose FFC 2 d


Card Three

EK Gorman, White Rose Crafts, September Rose FFC 2 e
Card three features a piece of the Petallics cardstock, a trimmed piece of printed paper, stamping from the sentiment stamp set, ink from the Distress Oxide ink pad, three buttons and some of the vine ribbon.

EK Gorman, White Rose Crafts, September Rose FFC 2 f


Card Four

EK Gorman, White Rose Crafts, September Rose FFC 2 g
Card Four features two trimmed pieces of printed paper, two pieces of ephemera trimmed, ink from the included Distress Oxide and three sequins from the included Sparkle Blend Sequin pack.

EK Gorman, White Rose Crafts, September Rose FFC 2 h


Card Five

EK Gorman, White Rose Crafts, September Rose FFC 2 i
Card five features three pieces of trimmed paper, a strip of Petallics, and stickers from the sticker pack.

EK Gorman, White Rose Crafts, September Rose FFC 2 j


Thanks for peeking in today.  Let me know in the comments below which of the five cards is your favorite.  Until then, happy crafting.

Tuesday, August 27, 2019

Shabby Opera Beauties Paper Clips By Kim Fuller


Good morning friends, Kim here with my next DT Project for White Rose Crafts.
This time I have altered some large paper clips that were sent to me by a friend. I just loved them and wanted to use lots of fun WRC goodies to alter them.


I started off with the Juliet Paper from Scrapberry . I love this paper its so pretty and shabby and has lots of little images that work great for altering this type of thing.


I layered the paper first and added some laces to soften them.


I added some Recollections flowers to add some pink prettiness to them as well.


My last step was to add some Dovecraft Glitter glue to the frames to make them sparkle!


I love how they came out and I will be adding them to an upcoming journal soon.


Thanks for stopping by today, I hope you have found some inspiration here.

White Rose Crafts Products

Sunday, August 25, 2019

Thank You for Being So Amazing Card - Vintage Rose Kit

Hello Crafty Friends -Annie here with a  card using the New Release

The September Vintage Rose Kit is available for purchase now!

This gorgeous kit, with its rich color palette, is so evocative of the rose garden at the very end of summer... Deep, sultry reds and greens, with hints of pink and white. This bumper, jam-packed kit is a cardmaker's treasure trove!

TWENTY Double-Sided 6"x6" sheets Couture Creations "Vintage Rose" Collection papers
Kaisercraft 12" x 12" cardstock sticker sheet - "Romantique"
Tim Holtz Distress Oxide Ink Pad - Tattered Rose
Woodware Perfectly Clear Photopolymer Stamp Set - Sweet Sentiments
Ultimate Crafts Cutting Die - "Watercolor Bloom"
Bubble-pack of 4 Bronze-Colored Elegant Metal Roses from Enchanted UK
Selection of Dovecraft "In Bloom" Collection buttons
Pack of Kaisercraft soft pink floral adhesive rhinestones
Mid-Green Vine Style Leaf-Shaped Ribbon
Pack of Shaker Card Sparkles to coordinate with Kit colors
Selection of cards and envelopes from American Crafts, Kaisercraft and Jillibean Soup

Thank You for Being So Amazing Card

Let's Get started!

I start by gathering the components for the card. I trimmed the green gingham pattern paper to 3", the rose pattern to 1-1/4", I also trimmed a piece of Aspire Petallics Autumn Hay cardstock to 1". I die cut flowers from watercolor paper 5x, (I cut some of the leaves off for extra layering) and a card front panel from white cardstock. I pulled a few embellishments as well- washi, rhinestone flowers, puffy hearts and more (note - I didn't use all the embellishments I pulled - Yes, I am an overpuller 😉)

I used the Tim Holtz Distress Oxide Ink in Tattered Rose (from the Kit), Tim Holtz Distress Oxide Ink Worn Lipstick, Tim Holtz Distress Oxide Ink Bundled Sage & Tim Holtz Distress Oxide Ink Peeled Paint. I added a bit of water to the ink I smudged on my craft mat. I then used a paintbrush and colored the flowers and stems. On 2 of the flowers, I took out the little pieces, but on one of the flowers, I left all the pieces in - that is where I used the Worn Lipstick & Peeled paint to create some contrast and dimension. I set them aside to dry. 


Next, I start to assemble the card. I adhered the green pattern paper first, then the rose pattern paper. Then, I put a strip of gold washi onto the Aspire Autumn Hay Petallics cardstock.  Next, I placed the Aspire Autumn Hay Petallics cardstock on top of the seam of the two pattern papers.
 

Then, I gathered the dried flowers and adhere them to the front of the card. I place the two flowers that I removed the bits from down first. I then add a bit of foam adhesive to the flower with all the bit in and place it on top of the other flowers. arranging them to the left of the card. I tucked the extra leaves in under the flowers.


Next, I decide on the rhinestone flowers (from the kit) and some puffy hearts for embellishments. I added 3 of the rhinestone flowers on the watercolored flowers. I then added 2 tiny puffy gold hearts by the flowers.


Finally, I adhered the sentiment (from the kit) using a bit of foam. I add a tiny gold puffy heart onto the sentiment.

That's it the card is complete. 

Materials Used:
Couture Creations "Vintage Rose" Collection papers:
Green Gingham Pattern paper & Rose Pattern Paper
Kaisercraft 12" x 12" cardstock sticker sheet - "Romantique"
Thank you for being so Amazing
Tim Holtz Distress Oxide Ink Pad - Tattered Rose
Ultimate Crafts Cutting Die - "Watercolor Bloom"
Pack of Kaisercraft soft pink floral adhesive rhinestones

Other:
Canson Watercolor paper
Recollections Brand Cardstock: Heavy Weight White 110lb
Recollections Brand Washi: Gold Petite Bloom
Recollections Brand: Tiny Puffy Hearts 

Thank you for stopping by the blog today - I hope you found some inspiration!


Be sure to tag us White Rose Crafts LLC on social media 
if you create a project with products or kits purchased on the 

Saturday, August 24, 2019

August Sketch Challenge Reminder

There is still time to play with our current August Sketch Challenge, but not a ton of time.  You have till August 31st at midnight EST till add your project to the August Sketch Folder in our WRC Gallery Photo Album.  All of the details can be found here on the WRC Blog.

Need a little inspiration, then just check out what our design team has been creating.


Kim pulled out some Graphic 45 Princess Collection paper pack and rhinestone ribbon to play with the sketch for this month.

Esther got into the holiday mood while playing with this sketch and used the Paper Mania Ultimate A4 Die Cut Paper Pack Bellissima Christmas.  We are loving how this card turned out and hope she sends it to us for the holidays!

Anna-Marie
Anna-Marie used our new September "Vintage Rose" Subscription Kit to create a card using this month's sketch.


We just love how different each of these three cards are.  Now you need to show us how you will play with this sketch.  And we can't wait to see it.


Friday, August 23, 2019

Back To School Cards

Hello Crafty Friends - Annie here with some School Cards.

Most of our children have started or will be starting school soon. I thought it would fun to create a few cards to inspire them to back into school.

Card # 1 Learn Full Tutorial


Let's get started.

I gathered the components for the card. 
I stamped and colored the Ruler, & Pencil. I also stamped the Notebook paper 3x and added a few of the mini sentiments, math problem and letter grade to the paper. I trimmed the pattern paper and card front panel. I die cut a File Folder from yellow cardstock for some finishing touches I used some Gold stars, paper clip & chipboard tag.

 Next, I start layering the blue star pattern paper and a red cardstock onto the card front panel. Then, I layered the Ruler to cover the seams of the other papers.


I tucked two of the notebook papers into the little file folder. I added a bit of adhesive to make sure they don't move. Then, I added a paper clip. Place some foam adhesive to the back of the folder and placed it onto the card front. Next, I added the chipboard tag.


Then, I added a bit of foam adhesive onto the notebook paper with all the stamped mini sentiments and layered on the file folder. Next, I adhered the pencil toward the bottom of the notebook paper. For finishing touches, I added 3 gold stars.


Materials Used:
Woodware Collections: School Tots Stamp Set (math, ABC, school days, letter grades)
Hero Arts: Just A Note Stamp Set (Ruler & Notebook paper)
Tsukineko Memento Ink: Tuxedo Black
Recollections Brand Cardstock:  White, Red, & Yellow 
Sizzix Die: File Folder
Walmart Brand: Paper Clip
Dollar Tree Brand: Gold Stars
Spectrum Noir Markers: Pencil - MG1, IG1, & FS1
Ruler: RB1 &GY1
Chipboard Tag: Unknown - for my stash


Card # 2 - Hi-Ho- Hi- Ho It's Off To School We Go!

For this card, I basically followed the steps above. I added a scalloped yellow cardstock border under the white cardstock. I stamped and colored the elements (backpack, apples, book stack, & Lunchbox) I fussy cut them and popped them up on some foam tape and placed them on the white cardstock strip. I added a bit of foam tape on the back of the white cardstock strip and added it to the card front.

I cut some fishtail banners from the pattern paper and stapled them together with Tim Holtz mini Stapler. Tuck them just under the white cardstock strip. For the sentiment, I used a sticker that I backed onto white cardstock for a firm piece. I also added a bit of foam behind it. For a finishing touch, I added some Zig Wink of Stella on the apples and some Sakura Gelly Roll White pen.

Materials Used:
Sakura Gelly Roll Pen: White
Recollections Brand Cardstock:  White, Red, & Yellow 
Tim Holtz Idea-ology: Tiny Attacher & Staples
Lawn Fawn Dies: Stitched Scalloped Borders
Spectrum Noir Alcohol Markers: 
Backpack: TB1 & TB2
Apple: DR1, DR7, RB1, LG1 & LG2
Lunch Box: LG2 & LG3
Books: CT4, OR1, LG1, TB1, DR1
Sentiment Sticker: Making Memories (old school - I know)


Thank you for stopping by the blog today - I hope you found some inspiration!

Be sure to tag us White Rose Crafts LLC on social media 
if you create a project with products or kits purchased on the 

Tuesday, August 20, 2019

Where's the Coffee with Guest Designer Meghan

Hi Crafty Friends,It is Meghan, and I am so grateful to be Guest Designing for White Rose Crafts this month! 

This is my 3rd post so if you missed my take on the Sketch Challenge, head here

For my take on this month's theme: Back to School, head here

For this card, I wanted to share one of my favorite things COFFEE! I love dark roast coffee made with a Chemex.

Make Crafty Friends Q & A:
Q: How do you make your coffee? What kind do you like?
A: Me? Chemex is the best tasting coffee and I love Trader Joe's Dark Roast Sumatra


My niece, nephew and cousins having their first Cup of Joe (juice in coffee cups)

 I started my card with the Lawn Fawn 6x6 Plaid Paper pack. I die cut the different plaids to make my panel and then the square frames to highlight the bunnies in their mugs.

 I finished my card with some enamel dots and the cute sentiments.


Cheers!

Thank you so much for stopping by! Want to see more of my designs, pop over to my https://madebymeghank.blogspot.com/ and check out all that I have going on!

Supplies


Postage Square Die
Stitched Square Die