Showing posts with label ScrapBerry. Show all posts

Tuesday, June 7, 2022

"Hello" Card

   Hello, my friends!

It's Nancy here with a new card share!

My card today was totally inspired by this pretty paper!
It's another page from the ScrapBerry Garden of Delights 6 x 6 Paper Pad.

I've been stitching longer than I've been paper-crafting,
so when I saw this paper with an even weave fabric design
...well...I just had to stitch on it!

Here's my card:


Isn't that a lovely paper for stitching?
I simply wrote "hello" on the paper with pencil.
 I then took my piercing tool and pierced holes evenly along the pencil lines.
I erased the pencil lines and did a simple running stitch along the holes.


Here's a closer look at the paper and the stitching.


I added the ScrapBerry Bird in Basket Charm
to a piece of the pink Dovecraft Forget-Me-Not Raffia String.
I tied it in a bow and adhered it in place.


I took three pretty Mulberry Paper Flowers,
twisted up the green stems, and adhered them in place!


I love stitching and stitching on paper is really fun! 
Give it a try!

* * * * *

White Rose Crafts Products Used:


* * * * *

Thanks so much for stopping by!
Please come back next week to see another fun project for
White Rose Crafts LLC.

* * * * *
 Nancy :o)
The Nickel Nook

Wednesday, June 1, 2022

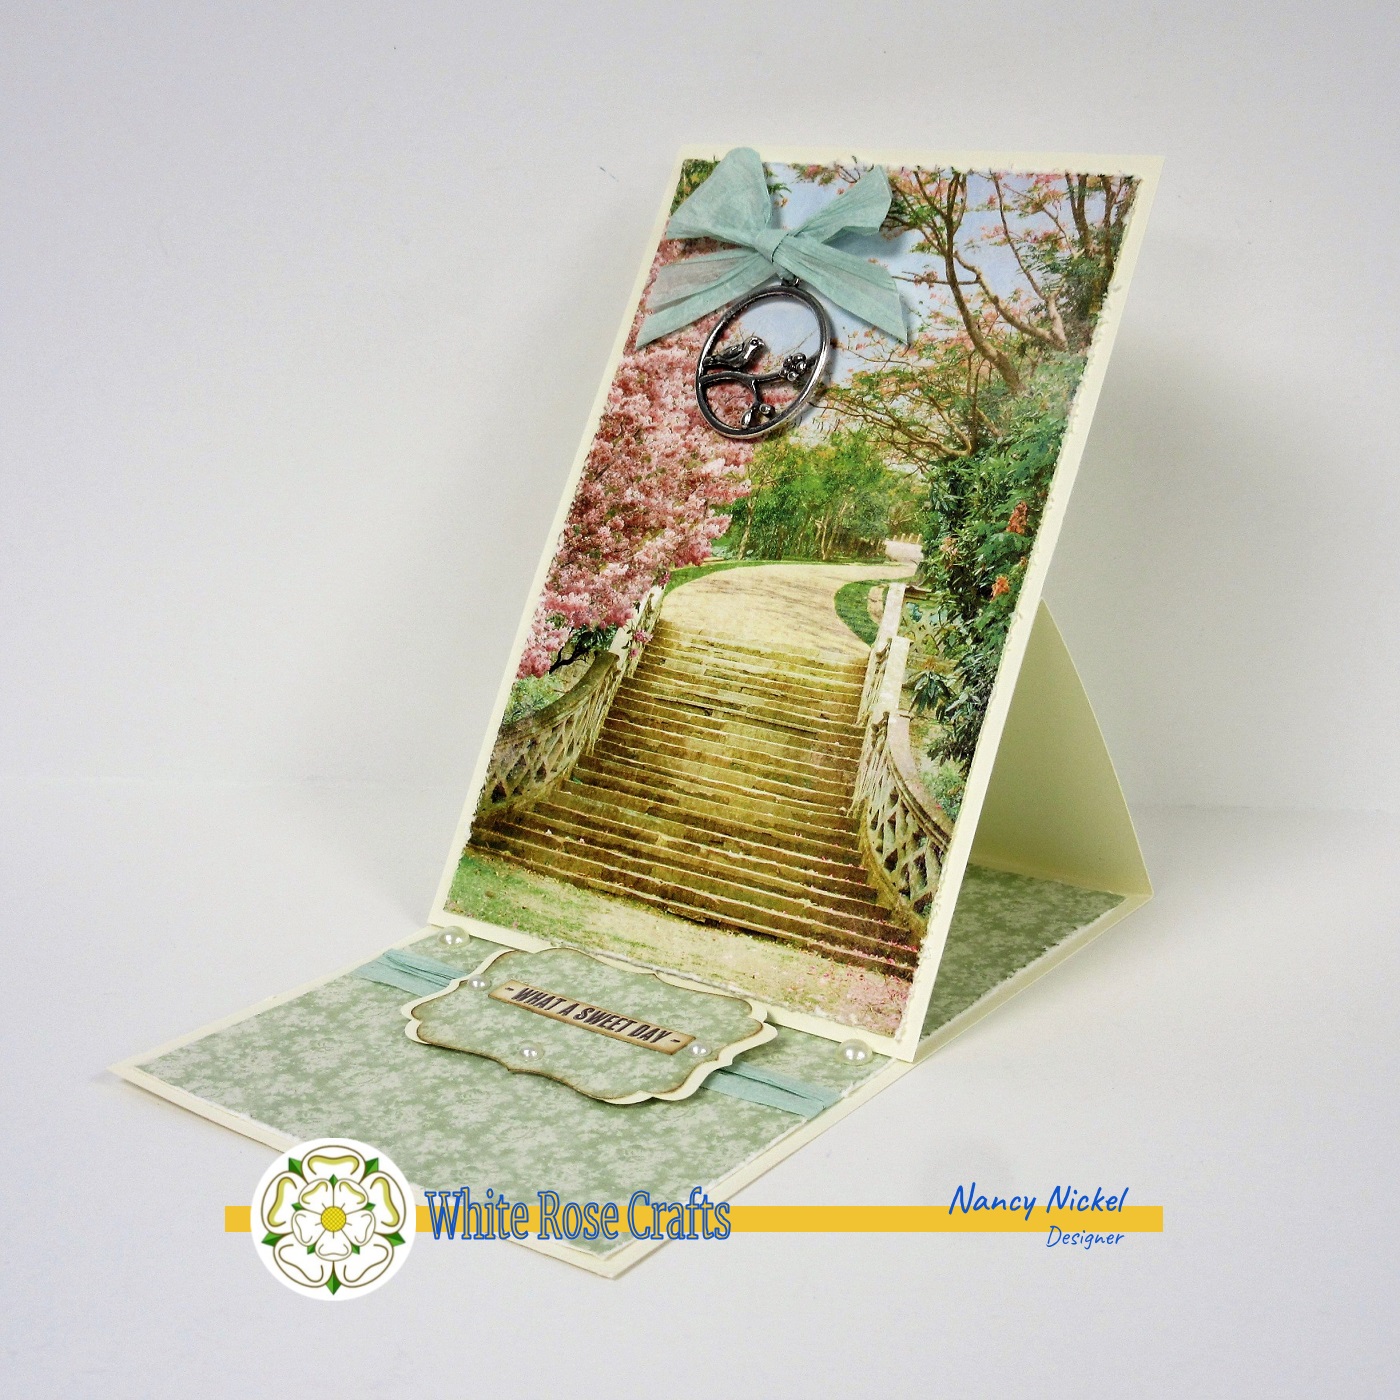
What a Sweet Day Easel Card

  Hello, friends!

It's Nancy here with you today, and it's time for a new project for White Rose Crafts LLC.  

Today I have another card featuring products from Scrapberry,
along with a few other products.

Here's my card:


This is one of the beautiful papers from the Garden of Delights Paper Pad!
Doesn't it make you want to walk right into that gorgeous scene?
It was calling out to me to be made into an easel card.
You walk up from a field of green to follow along the pretty path!


I wrapped a piece of the green raffia, 
from the Dovecraft Forget-Me-Not Raffia String, around the green patterned base.
   I punched out some labels and layered them on some foam tape,
which I positioned on top of the raffia.
This, along with some pretty pearls, serves as a stopper. 


 When it came to adding the sentiment,
I wanted to ensure it was something that suited the scene.
This little word label caught my eye, and seemed just right!
It's a part of the Melissa Frances The Sweet Life Mini Album Kit.
This kit happens to be on my desk, as I'm working on it for an upcoming post.


Here's a closer look at the sweet ScrapBerry Bird in Round Charm.
I tied a raffia string bow through the loop of the charm,
and adhered in in place in the scene.


Sometimes when making a project, using paper such as this,
it's fun to escape into a bit of a fantasy land that the scene offers! ;o)

* * * * *

White Rose Crafts Products Used:


* * * * *

Thanks so much for stopping by!
Please come back next week to see another fun project for
White Rose Crafts LLC.


Tuesday, May 24, 2022

Best Wishes Card

  Hello, everyone!

It's Tuesday, so it's Nancy here with a new project share.  

Today I have another card featuring products from Scrapberry,
along with a few other products.

Here's my card:


The papers in the Garden of Delights Paper Pad are just so pretty!
They make it easy to put together a lovely card.
I layered this pretty blue paper onto a navy card base.


I just love the pretty birds in the top corner. 
I added the "BEST WISHES" from the 13@rts Alice in Candyland Sticker Sheet.
These clear stickers blend beautifully into any coloured background.


I wrapped some of the pink raffia,
around the bottom of the card.
I also added the pretty ScrapBerry Lovebirds Charm.


There are so many fun products in the shop
that make it quick and easy to create a pretty card!

* * * * *

White Rose Crafts Products Used:


* * * * *

Thanks so much for stopping by!
Please come back next week to see another fun project for
White Rose Crafts LLC.

* * * * *

Tuesday, May 17, 2022

Over the Rainbow Card

  Hello, friends!

It's Nancy here with you today!

 I have a card featuring products from Scrapberry. 


The background paper is from the beautiful Garden of Delights Collection.


It's the perfect backdrop for this lovely stamp. 

I stamped the image with Archival Ink,
and then coloured it in with some watercolour crayons and a water brush.
It has some beautiful sparkle and shimmer to it.


I adhered the image in place using foam tape.

To finish things off, I added a pretty Raffia String bow.
I wanted a fuller bow, so I opened the string up before tying it
and adhering it in place.


Another fun project,
put together with great products from White Rose Crafts LLC! 

* * * * *

White Rose Crafts Products Used:


* * * * *

Thanks so much for stopping by!
Please come back next week to see another fun project for
White Rose Crafts LLC.

* * * * *
 Nancy

Tuesday, March 29, 2022

"Beautiful" Card by Nancy

 Happy Tuesday!

It's Nancy back with a fun new project. 

 Today I am sharing a card using a combination of great products from the shop.
You'll find all the links at the bottom of the post!

Here's my card:


These products are so pretty!
It was a pleasure to put them all together.
I started with a teal coloured card base,
and then added this beautiful floral paper to the front.


I covered the delicate frame with glue, and then sprinkled it with fine glitter to match.
The sentiment is a clear sticker. 
I adhered it to white cardstock, and then trimmed it to fit into the pretty frame.
I adhered the sentiment to the front of the card
When the frame was all dry, I adhered it in place over the sentiment.

I used the floral stamps from the stamp set, and stamped several using yellow ink.
I adhered them in place on the card from,
tucking some little punched branches behind.
I added some bling to the center of each flower.


I just love these floral sprig charms.
I used a brad to add it to the corner of the card.
The charm matches the flowers on the paper so beautifully!


The glitter on the frame and the bling in the flowers
gives the card such a lovely amount of sparkle!

Head on over to the shop to check out all the fun products!
Then make some pretty cards of your own!

* * * * *

White Rose Crafts Products Used:


* * * * *

Thanks so much for stopping by!
Please come back next week to see another fun project! :o)

* * * * *
 

Sunday, March 20, 2022

Weekly Newsletter


New In Store NOW!

Capture all the vibrant colors and Spanish passion of the CARMEN Collection from 13@rts

Think scented, blossom-laden, balmy nights and flamenco... it's all here in this glorious papercrafter's collection designed by Aida Domisiewicz.

  • 12"x12" paper packs
  • 6"x6" paper packs
  • Die-cut ephemera
  • Self-adhesive elements

See our complete collection HERE:

CARMEN

Pretty up your projects with beautiful new embellishments!

We've just taken delivery of a fabulous assortment of new embellishments from Melissa Frances and ScrapBerry!

  • Adhesive Gems
  • Mulberry Paper Flowers
  • Flat-Backed Resin Embellishments
  • Brads
  • Cabochons

See all the New Arrivals HERE:

New Arrivals


CALLING ALL MAKERS!
Come strut your stuff with us!


Post your Monthly Color Challenge makes in the White Rose Crafts Gallery on Facebook - and if we feature it, you'll earn a $15 store credit!

We love when customers show us what they've made with their goodies, and it's always so good to get feedback from such a happy, supportive, encouraging community of likeminded crafters! We have a monthly Color Challenge, and if we feature one of your makes on social media or in a newsletter, you'll earn yourself a very nice $15 store credit - and who doesn't need a little extra help with feeding their craft habit these days?

THIS month's Color of the Month YELLOW. If you move fast, you can still make it by the end of the month! Next month (April), to celebrate those lovely colors we associate with Easter and Spring, you have an open choice of ANY Pastel shade!

Make anything you like!

  • Cards
  • Scrapbook Pages
  • Home Decor
  • Mini Albums
  • Journals ... just to start you with a few ideas!

Join the White Rose Crafts Gallery community and get involved HERE

Join the Gallery HERE


And finally.... THE BIG SAVINGS YOU'VE BEEN WAITING FOR! 


Embossing Folders 15% OFF

Use Checkout Code EMBOSS15 and get 15% off all embossing folders! Offer ends 11.59pm EST on Friday, March 25.

Shop Embossing Folders HERE:

EMBOSSING FOLDERS


Lawn Fawn Bundles
25% OFF

No Code Needed! Shop our Bundle Deals and save 25% when you buy stamps and matching dies!

Shop Bundle Deals HERE

Bundle Deals


And last but DEFINITELY not least - 58% OFF Nuvo Expanding Mousse! 

BUT... you'll need to move fast: we have limited stock and they're FLYING off the shelves. No Code Needed!


See our range HERE:

Nuvo Expanding Mousse

Sunday, May 9, 2021

Last Night at Sunny Hill Layout

 Hello! Alison Heikkila here. Today I have a scrapbook page to share with you. It's been far too long since I've made a layout, and I was really inspired by a challenge by Gel Press...which was to use your prints on a scrapbook page. I found a photo of my family and I on our last night of vacation. It's always a bittersweet night because it's so much fun, but we're sad that we have to leave the next day. I opted to highlight all of the good things about the evening, and I managed to use 3 Gel Press Prints on my page. White Rose Crafts has lots of products for scrapbooking as well as gel printing, and there's is more coming in future months!

The first print is over on the left of the layout. I used a couple of swirly stencils as well as alcohol inks to create it. If memory serves me correctly, it was done on a roll-off print. I thought this print pulled from the colors of the photo really well. As I was gathering my prints, I also looked at my Graphic 45 and Kaisercraft patterned paper. I found that the Bombay Sunset paper pad from Kaisercraft would come through for me once again, (man, do I love that paper!) and I used 4 different prints from that one pad.

The long strip of patterned paper on the right is from Graphic 45. I built my page on some espresso colored cardstock and flicked on some Sheer Shimmer Spritz in Gold. This tied in really well with the foil accents on one of the Kaisercraft papers.

I chose another Gel Press print that had subtle colors on it and I stamped AALL & Create's Reverse Crescents with Monarch VersaFine Clair ink, which I then embossed with clear powder. I used a long monoprint as my journaling spot. I especially love those messy edges. I also matted my photo with purple cardstock, which I left a little long on the bottom so that I could emboss the edges with gold embossing powder. For a little texture I used a green Pearl Swirl from Scrapberry.

I love the mix of all of the patterns that wound up on this scrapbook page. It's not the greatest photograph, but it's an amazing memory. We had an amazing vacation back in 2019 and I think this page shows off how happy we were with all of the colors and layers. Please head over to White Rose Crafts to check out the thousands of items they have. And, hang out with us in the White Rose Crafts Gallery on FB! Thanks so much for stopping by. Have an inspiring day!

Wednesday, December 9, 2020

Merry Christmas Cards featuring the A Merry Little Christmas Kit

 Hello Crafty Friends - I am here with 2 cards using the A Merry Little Christmas Kit.

Card #1 - Merry Christmas


I gathered the supplies from the kit. I have the Decoupage paper, the specialty gold cardstock, the puffy Reindeer trim and the red and green pearl stickers. From my stash I have white card base, White, Green and Red cardstock and adhesive.

I start by inserting a piece of white cardstock into my Xyron Creative Station Lite. I will use this for the decoupage paper. I adhere the decoupage paper to the white cardstock it measured 4"x51/4".

Next I adhere a strip of green cardstock to the bottom of the card panel. It measures 1"x4". I then adhere the reindeer trim on the seam of the green cardstock. Next I die cut the Merry Christmas from the Gold specialty paper and adhere it below the reindeer in the center.  I then adhere one of the red mini pearls to the nose of the first reindeer. Making him into Rudolph.
 

Now, the card is not complete!


Supplies Used:
Memory Box Die: Merry Christmas
Xyron Creative Station Lite
Recollections Brand 110# Cardstock: White
Recollections Brand 80# Cardstock: Green and Red


Card #2 Merry Christmas


I start by gathering my supplies. I stamped the Christmas tree 3 times onto white cardstock. I also trimmed the green cardstock a 1/4" smaller than my card base. I trimmed the pattern paper to 3" X 4".


I adhered the Green cardstock onto the card base. 
Then, I adhered the pattern paper onto the green cardstock. 
Next, I put a piece of Gold Glitter washi tape at the base of the pattern paper.

Next, I die cut the tree panel with the stitched rectangle. 
I stamped the sentiment and fussy cut it out.
 I foam mounted both the tree panel and sentiment to the card.

Finally, I added some Nuvo drops to the trees and snowflakes.

Now the card is complete!
Supplies Used:
Lawn Fawn Brand Die: Stitched Rectangles
Recollections Brand 110# Cardstock: White
Recollections Brand 80# Cardstock: Green and white
Recollections Brand Washi Tape: Gold Glitter

Thank you for stopping by the blog. I hope you found some inspiration!

Be sure to tag us White Rose Crafts LLC on social media 
if you create a project with products or kits purchased on the 


White Rose Crafts Design Team Member Annie Collins 
Blog: https://littlewingscreates.blogspot.com/ IG: @anniec09