Hello Crafty Friends - Annie here with a watercolor mother's day card.
Don't worry I promise you can do this. If you can stamp, heat emboss and add a bit of color then you can create this card.
So let's get started. This is the card I created.
First, you will need to stamp your image onto watercolor paper (unless you are using Zig or Arteza Real brush pens - I would use Strathmoore Bristol Smooth Cardstock). I cut my watercolor paper to a A2 size piece so that I easily turn it into a card later.
Now, I prep my paper for heat embossing with an anti-static tool. Then, I stamp my image using VersaMark ink and then cover the image with white embossing powder. Shake off the excess powder and heat set it with a heat tool until powder is melted and shiny.
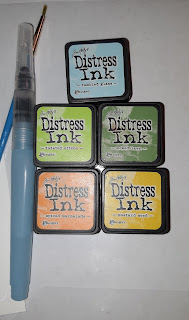
Next, gather your watercolor supplies, I am using Distress ink mini cubes along with a water brush pen and a piece of plastic for a palette.
I will be doing the wet on wet technique (this is when you wet your paper first with clean water then you just drop in a bit of watercolor in the same spot). The embossing creates little wells for the colors to gather so it's pretty easy. I start with a bit of yellow. If any of the color goes outside the white lines just use a paper towel or towel to clean it up. If any of the color remains then just add a bit of clean water and dab with a paper towel until the color is removed.
Now, I add a bit of orange color to the center of the flowers. The, I will blend the yellow and the orange together. Just like when you color with your markers or color pencils.

Next, repeat the process with the greens. I used 2 shades of green for the leaves and the dragonfly.
Then, I added a bit of light blue around the image for a bit of shadow. I did the blue a bit darker towards the bottom of both the flowers and the dragonfly. You are now done water-coloring your images. You can either set it aside to dry or use your heat tool to dry it. I set mine aside to dry since the images are small and I didn't use a lot of water.
Now, while the images are drying I trimmed some pattern paper, cardstock and die cut part of my sentiment. Then, I gathered all the components to create the card front panel.
I start with the base of my panel (notice I trimmed away some of the pattern paper- I was thinking of using it for my die cut word then I changed my mind). I adhere the pattern paper to the cardstock mat making sure to leave about an 1/4" all around. Next, I adhere the water-color panel.
Now, I take the die cut word - HAPPY - which I die cut 3x. once from specialty gold paper and 2x from white cardstock. I then do the glue and stack process to create a nice sturdy piece.
Next, I stamped the rest of the sentiment onto light green cardstock using the darker green Distress ink. I then cut it into a strip and did a decorative slant end on one side. I adhere the die cut word onto the card front panel and just tuck it into the Y from the word happy. Next, I adhered the card front panel onto my card base. For finishing, I added a few Sparkle Blends: Birthstone Collection May Emerald to the card.
Now, the card is complete!
Supplies Used:
Ranger-Tim Holtz: Distress Inks: Spiced Marmalade, Mustard Seed,
Hero Arts Stamp & Cut Happy Set
Recollection Brand Cardstock: White, Butter yellow & soft pink
* Inkadinkado's Beauty Stems is sold out -
I link another set just in case you are interested
Thank you for stopping by the blog today!


No comments:
Post a Comment
We at White Rose welcome your comments and questions, but please keep them clean and kind! Thanks!